
| Column Label | Description |
| Name | Name of the Job |
| Description | Description of the Job |
| CA Job? | Whether this is CA Job? Yes or No |
| Scheduled | Scheduled Status of the Job. Yes or No |
| Months | Months the Job is scheduled to run |
| Days | Days the Job is scheduled to run |
| Hours | Hours the Job is scheduled to run |
| Minutes | Minutes the Job is scheduled to run |
| Active | Status of Job. Active or Inactive |
| Last Updated | Date the Job was Last Updated |
| Code | Unique internal Code of the Job |
| Created By | Name of Resource who created the Job |
| Date Created | Date the Job was created |
| Executable | Executable of the Job |
| Job Code | Unique Code of the Job |
| Schedule Date | Scheduled date of the Job run |
| Type | Type |
| Updated By | Name of Resource who updated the Job |
-
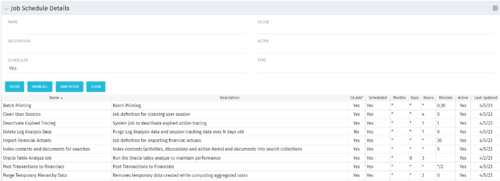 The Job Schedule Details portlet shows al jobs and displays all of the scheduled and non-scheduled information for those jobs – including the months, days, hours, and minutes. It also displays the last time the job was updated and whether or not the job was custom or a CA job. The portlet will help the administrator understand the current job schedule configuration. The table below describes the available columns in the portlet. The first 10 are configured in the default view:
 -
The Job Schedule Details portlet shows al jobs and displays all of the scheduled and non-scheduled information for those jobs – including the months, days, hours, and minutes. It also displays the last time the job was updated and whether or not the job was custom or a CA job. The portlet will help the administrator understand the current job schedule configuration. The table below describes the available columns in the portlet. The first 10 are configured in the default view:
Column Label Description Name Name of the Job Description Description of the Job CA Job? Whether this is CA Job? Yes or No Scheduled Scheduled Status of the Job. Yes or No Months Months the Job is scheduled to run Days Days the Job is scheduled to run Hours Hours the Job is scheduled to run Minutes Minutes the Job is scheduled to run Active Status of Job. Active or Inactive Last Updated Date the Job was Last Updated Code Unique internal Code of the Job Created By Name of Resource who created the Job Date Created Date the Job was created Executable Executable of the Job Job Code Unique Code of the Job Schedule Date Scheduled date of the Job run Type Type Updated By Name of Resource who updated the Job -
 An updated version of our training material for Jaspersoft Ad-Hoc Reporting for Clarity. Introduces Jaspersoft as a reporting tool, explains security, the data warehouse, and JS Domains. Then delves into navigation, running a report, creating an ad-hoc report, saving it, creating a cross tab report, creating a chart, creating a dashboard, and scheduling the report.
 -
 A Quick Reference Guide to assist in the process of creating a chart in Jaspersoft. The guide walks through the steps using screenshots.
 -
 A Quick Reference Guide to assist in the process of creating a crosstab in a Jaspersoft Ad-hoc report. The document uses screenshots to walk you through the process.
 -
 A Quick Reference Guide with tips on creating a Dashboard in Jaspersoft. The document walks through the steps and uses screenshots to show the process.
 -
 A Quick Reference Guide to assist in the process of creating a table in a Jaspersoft Ad-Hoc Report. Uses screenshots to walk you through the process.
 -
 A Quick Reference Guide to assist in creating or adding Calculated Fields or Measures to a Jaspersoft Report. Calculated Fields or Measures can be created and added to a new or existing Ad-Hoc view by applying formulas to the measures.
 -
 A Quick Reference Guide to assist in the process of adding filtering for the data to be presented in a Jaspersoft Report. If a report output contains more information than desired, Jaspersoft Reporting provides an interactive filtering capability so only the necessary data is displayed. The filtering conditions can include fields, numbers, dates and text. Filters can be added to reports as they are being created or adding to saved views. Filters cannot be added to a Report.
 -
 A Quick Reference Guide to assist in the process of running a Jaspersoft Report. Guide walks through the steps and has screen shots to assist in the process.
 -
 A Quick Reference Guide to assist in the process of scheduling a Jaspersoft Report to run. Gives you the steps and shows screen shots to assist with the process.
 -
 A presentation by the Broadcom leadership on the meaning of ValueOps and the future of Clarity and Rally.
 -
 A presentation by the Broadcom leadership on the meaning of ValueOps and the future of Clarity and Rally.
 -
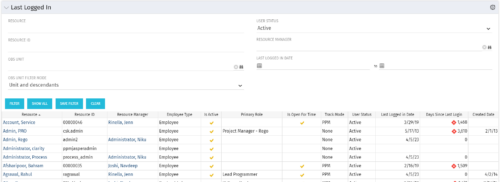 The Last Logged In portlet provides the administrator with an overview of all users within the system and the last time he or she logged into Clarity. Using this portlet, administrators can quickly cleanup any inactive users or provide a list of users to managers that are not logging into the system. The portlet provides several pieces of information related to the resource as well as a “Days Since Last Login” with a status indicator. The administrator may filter on resource/id, OBS, user status, resource manager, or last logged in date to narrow down the results.
 -
The Last Logged In portlet provides the administrator with an overview of all users within the system and the last time he or she logged into Clarity. Using this portlet, administrators can quickly cleanup any inactive users or provide a list of users to managers that are not logging into the system. The portlet provides several pieces of information related to the resource as well as a “Days Since Last Login” with a status indicator. The administrator may filter on resource/id, OBS, user status, resource manager, or last logged in date to narrow down the results.
-
 Course Description: Are you using an older version of Clarity PPM? Do you want to understand the value of new features and functions in recent versions? This class is a demonstration of the new features and the value of these features for customers.
 -
 Do you want to understand the value of the new functionality in Clarity's most recent rollout? This class is for you! Attend an interactive demonstration and put these capabilities in action today.
 -
 Are you on an older version of Clarity? Do you want to understand the value of the new features and functions in recent versions? This class is a demonstration of the new features and the value of these features for customers.
 -
 A presentation slide deck from Rego University 2022. This document reviews the changes to Clarity with the release of version 16.0.3.
- Roadmap Enhancements
- Checklists and To-Dos
- Project and CIT List Enhancements
- Sub-Object Enhancements
- Customer Requests
-
 Are you on an older version of Clarity? Do you want to understand the value of the new features and functions in recent versions? This class is a demonstration of the new features and the value of these features for customers.
 -
 With every new PPM process, the organization must adopt change. Change is constant in an organization. This session will talk about keys to successfully leading change vs. just implementing change in your organization.
 -
 A presentation slide deck from Rego University 2022. This document reviews the importance and principles of Organizational Change Management.
- Why is Organizational Change Management Important?
- Impacts of not recognizing the need for an Organization Readiness (OR) Plan
- What are the components of Organizational Change Management?
- Considerations and activities for building a good OR Plan
- How to execute Organizational Change Management
- Framework – Proven Methodologies and Tools
- Q&A
-
 Course description: “It’s easy to focus on the “cool” new features of the latest release and overlook the impact on specific End Users, and how they actually use new features and modules. Focusing on what Users need and want may not be easy, but it will lead to greater engagement, strong adoption and increase value of CA PPM. Join Empowered Networks for this session to discuss how to leverage User Personas in configuring CA PPM.”
 -
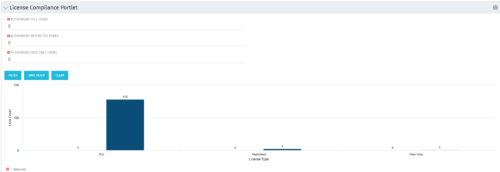 Portlet to quickly show License Compliance for all license types. Simply Enter your License Limits in the filter – The portlet will display the three license types in a grid format with compliance chart and RYG Icons.
 -
Portlet to quickly show License Compliance for all license types. Simply Enter your License Limits in the filter – The portlet will display the three license types in a grid format with compliance chart and RYG Icons.
-
Portlet to quickly show License Compliance for all license types. Simply Enter your License Limits in the filter – The portlet will display the three license types in a grid format with compliance chart and RYG Icons.
-
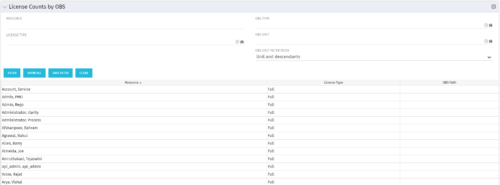 The License Count by OBS portlet displays license type information by a selected OBS for active users. The portlet is used to determine what kind of license a specific user has and the OBS in which he or she resides. It can be helpful for determining specific amount of licenses used by different departments within the organization.
 -
The License Count by OBS portlet displays license type information by a selected OBS for active users. The portlet is used to determine what kind of license a specific user has and the OBS in which he or she resides. It can be helpful for determining specific amount of licenses used by different departments within the organization.
-
 The primary purpose of roles is to determine the amount of resource requests based on unapproved (uncommitted) and approved (committed) projects. Roles are non-named resources which are later allocated to named resources within CA PPM. Using roles is the best way to do "What If" scenario planning and determine needed capacity. This document assists in making Best Practice decisions around setting up roles in Clarity.
 -
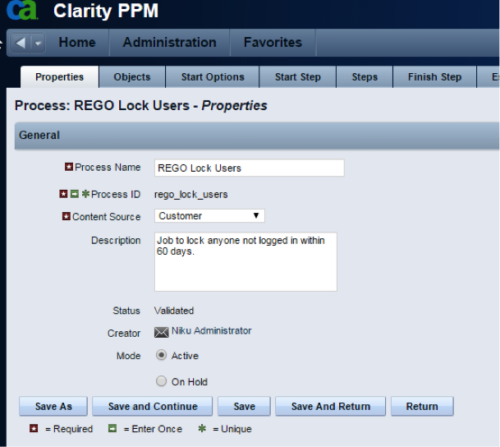 The Lock Inactive Users workflow process will automatically lock all user accounts when their last login date was more than 60 days ago. The process can be scheduled to run daily or can be run on demand when resource account cleanup is needed.
 -
The Lock Inactive Users workflow process will automatically lock all user accounts when their last login date was more than 60 days ago. The process can be scheduled to run daily or can be run on demand when resource account cleanup is needed.
-
The Lock Inactive Users workflow process will automatically lock all user accounts when their last login date was more than 60 days ago. The process can be scheduled to run daily or can be run on demand when resource account cleanup is needed.
-
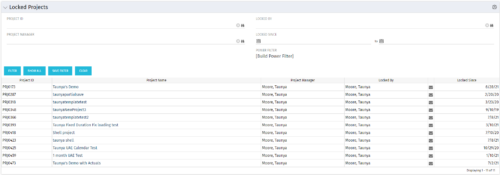 The Locked Projects portlet displays all of the projects in the system that are currently in a ‘locked’ state. The user may view the project ID, Project Name, Project Manager, the user who locked the project, the user's email address, and the date the project was locked. Administrators may utilize the data in this portlet in order to determine if a manual unlock should be executed on a project that has been locked for an extended period of time. Extended locks may indicate the individual has forgotten that he or she had obtained the lock. The portlet includes a hyperlink on the Project Name field, which will allow the administrator to more easily access and unlock the project as well as an email link to mail the user who locked the project.
