-
 The Custom License Count portlet displays the license type and number of users with each type of license. This portlet can be modified by adjusting the query to exclude certain rights within manager licenses based on negotiated license types with CA. For example, if CA allows creation of a sub-object to Incident to be included in a Team Member license, this portlet can be used to reflect the true license counts vs. the standard CA license counts.
 -
The Custom License Count portlet displays the license type and number of users with each type of license. This portlet can be modified by adjusting the query to exclude certain rights within manager licenses based on negotiated license types with CA. For example, if CA allows creation of a sub-object to Incident to be included in a Team Member license, this portlet can be used to reflect the true license counts vs. the standard CA license counts.
-
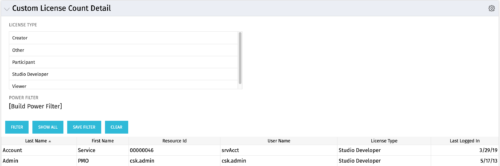 The Custom License Count Detail portlet displays the license type information for all users within Clarity as well as last login date for clean-up. This portlet can be modified by adjusting the query to exclude certain rights within manager licenses based on negotiated license types with CA. For example, if CA allows creation of a sub-object to Incident to be included in a Team Member license, this portlet can be used to reflect the true license counts vs. the standard CA license counts.
 -
The Custom License Count Detail portlet displays the license type information for all users within Clarity as well as last login date for clean-up. This portlet can be modified by adjusting the query to exclude certain rights within manager licenses based on negotiated license types with CA. For example, if CA allows creation of a sub-object to Incident to be included in a Team Member license, this portlet can be used to reflect the true license counts vs. the standard CA license counts.
-
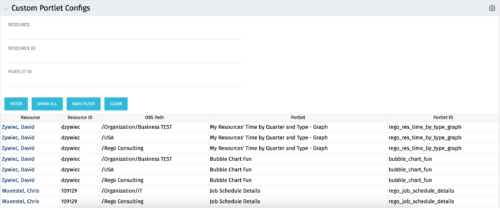 The Custom Portlet Configs portlet will display all portlets where the user has modified any settings like the filter or list views. This portlet is helpful for troubleshooting and to determine which users may be affected during an upgrade. The portlet may be filtered by several criteria and displays the resource name, ID, OBS path, portlet, and portlet ID.
 -
The Custom Portlet Configs portlet will display all portlets where the user has modified any settings like the filter or list views. This portlet is helpful for troubleshooting and to determine which users may be affected during an upgrade. The portlet may be filtered by several criteria and displays the resource name, ID, OBS path, portlet, and portlet ID.
-
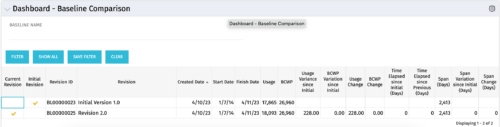 The Dashboard: Baseline Comparison portlet compares multiple baselines on a single project. The portlet is added to the dashboard page of a project and will pull in both baselines for that project and perform a comparison between the two. This portlet provides a quick way for project managers to view the differences between their baselines, especially if they have multiple members updating the project.
 -
The Dashboard: Baseline Comparison portlet compares multiple baselines on a single project. The portlet is added to the dashboard page of a project and will pull in both baselines for that project and perform a comparison between the two. This portlet provides a quick way for project managers to view the differences between their baselines, especially if they have multiple members updating the project.
-
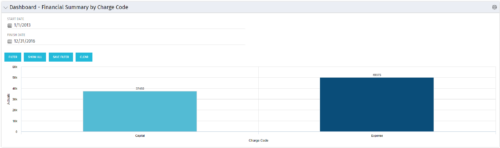 The Dashboard: Financial Summary by Charge Code portlet displays financial information from the project summarized by Charge Code. The portlet is added to the dashboard page of a project and will pull all actuals by charge code on the project. The user may filter by date range to narrow the results.
 -
The Dashboard: Financial Summary by Charge Code portlet displays financial information from the project summarized by Charge Code. The portlet is added to the dashboard page of a project and will pull all actuals by charge code on the project. The user may filter by date range to narrow the results.
-
 The Dashboard: Programs Portfolios portlet is placed on the dashboard page of a project. This portlet will show any programs or portfolios the project is a subproject of. The portlet will display the name, code, connection type, manager, and start/finish dates.
 -
The Dashboard: Programs Portfolios portlet is placed on the dashboard page of a project. This portlet will show any programs or portfolios the project is a subproject of. The portlet will display the name, code, connection type, manager, and start/finish dates.
-
 Are you looking for some great examples of dashboards that include metrics/KPIs? This session will review a host of sample metric dashboards in use today that can spark ideas for you to implement in your company.
 -

 This Portlet can be used to define User License Output information including the following:
- Resource
- Resource User Name
- Resource Id
- Resource Manager
- Resource Manager Email
- Primary Role
- Employment Type
- Org Structure Path
- Org Structure Lowest Unit
- Last Logged in Date
- User License
- Right License
- Access Right
- Access Right Type
- Access Right to OBS
- Granted Through Type
- Granted Through (Security Group)
- Access Right Description
- Resource OBS
- Resource
- Resource Manager
- Primary Role
- Employment Type
-
This Portlet can be used to define User License Output information including the following:
- Resource
- Resource User Name
- Resource Id
- Resource Manager
- Resource Manager Email
- Primary Role
- Employment Type
- Org Structure Path
- Org Structure Lowest Unit
- Last Logged in Date
- User License
- Right License
- Access Right
- Access Right Type
- Access Right to OBS
- Granted Through Type
- Granted Through (Security Group)
- Access Right Description
- Resource OBS
- Resource
- Resource Manager
- Primary Role
- Employment Type
-
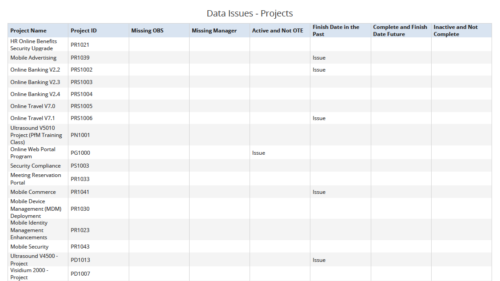 Data Issues – Projects report displays data exceptions related to projects. Data exceptions could be missing data or data not in required format for those project fields. User can further narrow their search by OBS Type & Path, Project Name, Project ID and Project Type.
 -

 This technical trick provides a supported method for removing team members from a project programmatically. This is a XOG-based solution that might be called by a gel script in a process workflow. Limitation is that the resource must NOT have actuals booked.
 -
 Has your organization made significant investments in technology solutions without seeing precise results? Do you have the right capabilities yet lack an interconnected, end-to-end solution? A holistic Ecosystem Assessment will evaluate the current state of your project management practices across People, Process, Tools and Governance to compare against industry best practice. Join Rego Expert Guides Jacob Cancelliere and Nipun Karla as they discuss our proven process that can help optimize your ecosystem and drive strategic results.
 -
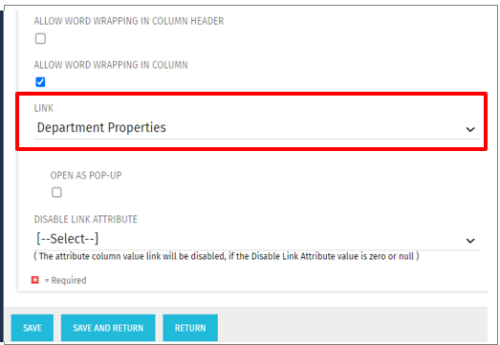 This Tech Trick allows the ability to link anywhere within the larity environment from a custom portlet link, even if it is not a standard OOTB link option. For example, you could link to a Departments page or directly to a timesheet even though these are not standard OOTB links to choose from when creating custom portlets. This trick works in Clarity versions 12, 13 , 14 and 15 for both SQL and Oracle environments.
 -
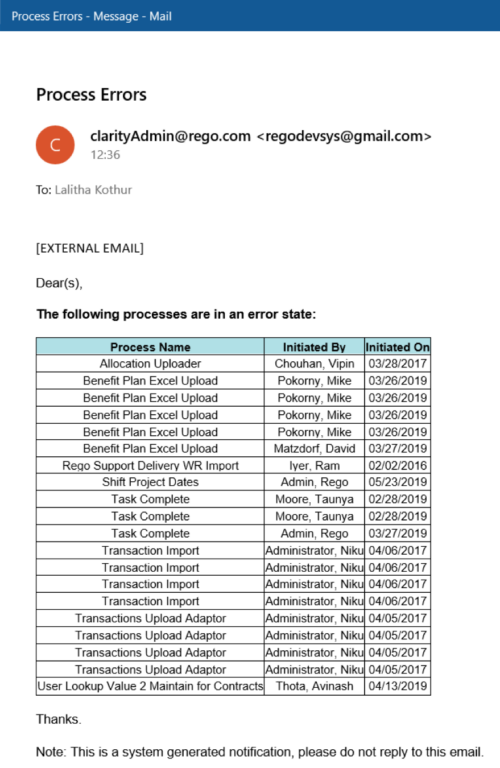 The Email Process Instance Errors workflow process will email a selected group within Clarity informing them of process errors that are currently in the system. The selected group is input through a gel parameter so it may be easily changed. This workflow helps to resolve errors quickly by emailing group members of the errors within the system so they may take action immediately.
 -
The Email Process Instance Errors workflow process will email a selected group within Clarity informing them of process errors that are currently in the system. The selected group is input through a gel parameter so it may be easily changed. This workflow helps to resolve errors quickly by emailing group members of the errors within the system so they may take action immediately.
-
 The Enhanced Time Tracking Stalker – Resource workflow process is used to notify resources who failed to submit a timesheet for the prior time period they must take action. The workflow checks for active resources (by using the hire and termination dates, their track mode and that they are open for time entry). Each resource who meet the criteria receives an email asking them to submit their outstanding timesheet(s). The email includes a table that contains this information: time period, timesheet status and any hours currently saved on the timesheet. All outstanding timesheets are included in the table with links to the timesheet in the Modern User Experience side of Clarity. This process helps to ensure the timely submission of timesheets.
 -
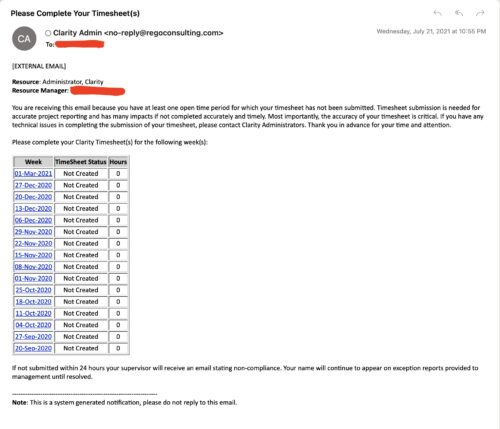 The Enhanced Time Tracking Stalker – RM workflow process automatically sends a single email to Resource Managers which contains a list of any of their resources that have not submitted their timesheet for a prior open time period. The email informs the RM if their resources are submitting their timesheets on time. The email includes a table that provides this information for each resource: Resource Name, Time Period, Timesheet Status and Total Hours saved on the timesheet with links to the timesheet in the Modern User Experience of Clarity. These notifications will help to ensure that time is being posted and approved in a timely manner.
 -
The Enhanced Time Tracking Stalker – RM workflow process automatically sends a single email to Resource Managers which contains a list of any of their resources that have not submitted their timesheet for a prior open time period. The email informs the RM if their resources are submitting their timesheets on time. The email includes a table that provides this information for each resource: Resource Name, Time Period, Timesheet Status and Total Hours saved on the timesheet with links to the timesheet in the Modern User Experience of Clarity. These notifications will help to ensure that time is being posted and approved in a timely manner.
-
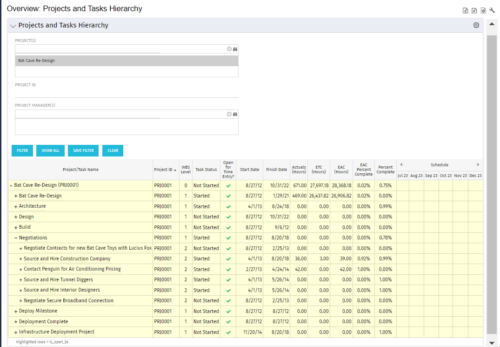 This document provides an overview of how hierarchical portlets can be exported to MS Excel. The code of a sample hierarchical portlet is explained. The included sample portlet shows a list of projects and the tasks under each project along with actual and assignment hours. The portlet can also be filtered by project and project manager.
 -
This document provides an overview of how hierarchical portlets can be exported to MS Excel. The code of a sample hierarchical portlet is explained. The included sample portlet shows a list of projects and the tasks under each project along with actual and assignment hours. The portlet can also be filtered by project and project manager.
-
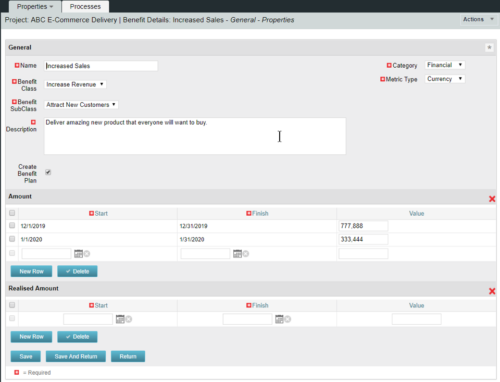 This configuration and accompanying process allows users to capture Financial and Non-Financial (Metrics, Soft, etc.) Benefit in a custom sub-object, then programmatically create an out-of-the-box Benefit Plan with just the Financial Portion from the custom sub-object. The solution is comprised of:
- Sub-Object (Benefit Plan Details, Parent = Project)
- Process: Create Benefit Plan (uses sub-object as primary input, native BP is output)
- Process: Update sql - Cost Benefit Plans (one-time script to update Projects)
- Ensure on the Benefit Details List view the Planned and Realized Amounts are displayed
- Modifying the Create Benefit Plan Process in support of a BP naming convention consistent with local PMO Practices
- Modifying the Create Benefit Plan Process to link the BP to the Cost Plan of Record
- Creating a Portlet that pulls together rows of data from the sub-object across multiple projects in a summarized view as well as a detailed view
-
This configuration and accompanying process allows users to capture Financial and Non-Financial (Metrics, Soft, etc.) Benefit in a custom sub-object, then programmatically create an out-of-the-box Benefit Plan with just the Financial Portion from the custom sub-object. The solution is comprised of:
- Sub-Object (Benefit Plan Details, Parent = Project)
- Process: Create Benefit Plan (uses sub-object as primary input, native BP is output)
- Process: Update sql - Cost Benefit Plans (one-time script to update Projects)
- Ensure on the Benefit Details List view the Planned and Realized Amounts are displayed
- Modifying the Create Benefit Plan Process in support of a BP naming convention consistent with local PMO Practices
- Modifying the Create Benefit Plan Process to link the BP to the Cost Plan of Record
- Creating a Portlet that pulls together rows of data from the sub-object across multiple projects in a summarized view as well as a detailed view


Copyright 2023 • Rego Consulting Corporation • Privacy Policy