| Installation files are not provided with the download. While the MUX Migration Tool is free, it does require some time by Rego Technical Staff to install. Approximately 4 hours is required. If you are current Rego Customer, this time can be applied against a current project if you choose, or against an Ad Hoc SOW/PO you have in place with us. Please reach out to your friendly Rego Account Director to arrange to have the tool installed. Installation files are not provided with this download. They will be installed by our staff.
If you are currently not a Rego client, we invite you to reach out to us at info@regoconsulting.com and we can arrange to set up an Ad Hoc bucket of hours for this install and any future work we can do for you. |
*Note: MUX Migrator v2.0 will only work on Clarity versions 16.1.0 and higher.
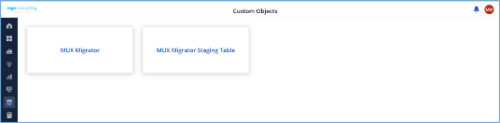
The Migration Tool for Modern UX Components provides the ability to migrate Blueprints, Views, and Field Level Security between environments. Previously, the promotion of these components needed to be done manually. This functionality, to be utilized by an administrator, is available under the Custom Objects Area of Clarity.
Source to Target Approach
The user would first create an ‘MUX Migrator’ instance and populate the associated details. Once ready, they will use the “Populate Stage Content” action which will run a workflow in the background to populate a Staging Table with Source Environments content. (Blueprints, Views, and Field Level Security)
After a successful populate, they would navigate to the “MUX Configuration” module where they can decide on what content they want to migrate between environments. They can select one to many components they wish to migrate.
Once the “MUX Configuration” sub-object is populated, the user can navigate back to the “Properties” module. Once a password is populated, the user can use the Actions drop-down to run the “Migrate Content to Environment” workflow. This will run a process that will migrate the content from the source environment to the target environment.
JSON Approach
The user would first create an ‘MUX Migrator’ instance and populate the associated details. They would navigate to the “MUX Configuration” module where they can decide on what content they want to migrate between environments. They can select one to many components they wish to migrate.
Once the “MUX Configuration” sub-object is populated, the user can navigate back to the “Properties” module. The user can use the Actions drop-down to run the “Export JSON” workflow. This will run a process that will generate a .txt file located in the “JSON File” attribute. That file can be downloaded from the Source Environment. The user can then login to the Target Environment. The user would first create an ‘MUX Migrator’ instance and populate the associated details. Once the ‘MUX Migrator’ instance is created, they can upload the JSON File that was downloaded from the Source Environment. The user can use the Actions drop-down to run the “Import JSON” workflow. This will run a process that will generate read the file located in the “JSON File” attribute and load the configuration into the Target Environment.
View Administration
The user would first create an ‘MUX Migrator’ instance and populate the associated details. They would navigate to the “MUX View Administration” module where they can decide on what views they would like to update the creator of. They can also reset the “default” view displayed when logged in for a resource(s), Security Group(s), or Resource OBS Node(s).
Prerequisites
- The user will create the migrator instances/run the processes in the Target Environment they wish to migrate content to (E.g., Run this in PROD to migrate the content from a lower environment to PROD)
- Any attributes that are part of the Blueprints, Views, or Field Level Security must exist in the target environment.
- The user that is utilizing the content must have the following security rights associated to their account.
- XOG rights to all the associated objects
- View/edit security rights to the MUX Migrator Object and MUX Migrator Content Object
- oView rights to the MUX Migrator Staging Table Object
- API-Access
- Process Start or Process AutoStart – All
|
|


 The Multi-Value Filter in Query-Based technical trick document provides an overview of how to create a multi-value lookup in a portlet filter, where the field is a parameter within the query. If the query imbeds the parameter normally, the portlet will only be able to have a single selection of that parameter. This technical solution will enable you to make these parameters multi-selects.
 Many organizations want to transition to a more product-centric delivery model but struggle with how to get started. This session discusses key success factors of Broadcom’s own project-to-product transition with an aim to resolve issues facing your organization.
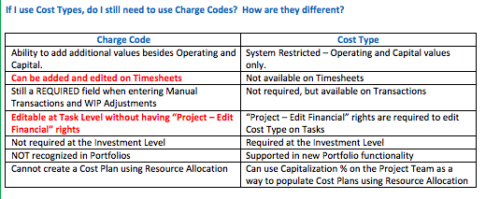 The Cost Type field was introduced in CA PPM 13.3, but had some limitations because it wasn’t available in certain financial areas. The CA PPM 14.3 release includes the addition of Cost Type in the Cost/Rate Matrix, Chargebacks, Transactions and WIP Adjustments. This Technical Trick assists you in moving from Charge Code to Cost Type.
 Aligning work to organizational strategy is a fundamental requirement in today’s ever-changing marketplace. High-performing organizations, however, are moving beyond basic connections to introduce strategic hierarchies that are tied at various levels to real measurements of business value via Objectives and Key Results (OKRs). Join our Guides as they present key concepts, best practices, and the evolution of strategic alignment.
 Do you have teams or groups that have a need for simple collaborative work management but are not using Clarity. And are those tools falling short when it comes to important issues such as visibility and governance. In this session you'll learn about Moventus a new add-on collaborative work management solution that can be embedded into Clarity.
 The Move Role to Team/Assignment process takes the role from the resource object and pushes that information into the team and assignment objects when the role is NULL on the team and assignment objects. This happens normally, assuming a resource has their primary role populated. This process is needed if a resource or set of resources were added to projects without having their primary role filled in.
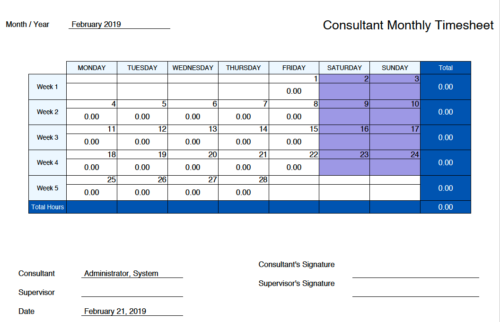 Monthly Actuals -User View is a standard calendar view of actuals posted by logged in user on each day of the selected month. Actuals also includes timesheets that haven’t been submitted/posted yet. Actual hours on the report are tied to user's availability i.e. when user has 0 availability (Saturday/Sunday/Holiday) then actuals are greyed out.
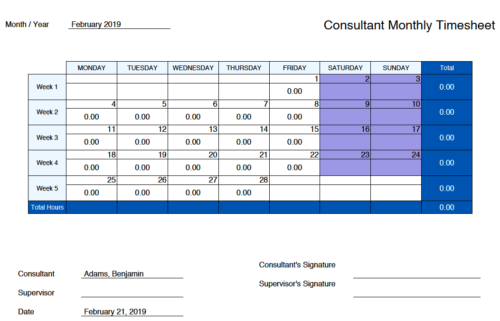 Monthly Actuals - Admin is a standard calendar view of actuals posted by a user on each day of the selected month. Actuals also includes timesheets that haven’t been submitted/posted yet. Actual hours on the report are tied to user's availability i.e. when user has 0 availability (Saturday/Sunday/Holiday) then actuals are also greyed out.
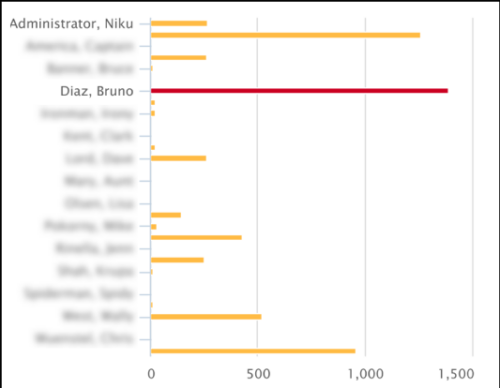 This Tech Trick covers instructions for modifying the default colors of a Chart in Jaspersoft Studio Reports using a dynamic expression. It includes step-by-step instructions for an example bar chart color change.