-
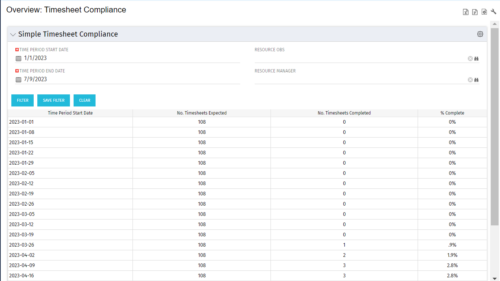 This portlet provides a view into the number of timesheets that were expected to be completed for a specified time period(s) as well as the number of timesheets that were completed and the percent complete. This can also be filtered by OBS so that a company can see timesheet compliance at the OBS level.
 -

Rego’s Clarity Adoption Metrics package consists of two sets of metrics: Project metrics, and Resource metrics. Project metrics measure how effectively project managers are using Clarity to manage their projects. Resource metrics measure how effectively resource managers are using Clarity to manage resources. Metrics are scored on a scale of 0 to 5, with higher scores indicating greater adoption and use. All metrics can be viewed numerically or graphically, and can be broken out by OBS. In addition, metric data can display as a 12-month rolling history to help identify trends. Project metrics can also display by lowest / highest adoption rates for a specific resource metric or all resource metrics. There is a variety of way to view the Adoption Metric data, therefore, Rego has made this simple by creating an Adoption Metrics object that contains multiple tabs. Each tab displays one or more of the Project or Resource Adoption Metrics. Based on the nature of the Metrics some tabs will allow the ability to use a pull down menu to select a specific Adoption Metric. There is also a Metrics trending view that pulls monthly snapshots of the metrics. Project metrics consist of the following: - Project Status Reporting – Measures how well PMs create and publish project status reports.
- Project Risk Adoption – Measures how well Risks are being used and managed.
- Project Issue Adoption – Measures how well Issues are being used and managed.
- Project Schedule – Measures how well PMs create tasks and keep the project schedule current.
- Project Baseline – Measures whether or not baselines exist.
- Project Zero ETC’s – Measures how well the PM assigns resources to tasks with ETCs.
- Project Past ETC’s – Measures how many improperly scheduled tasks the PM has.
- Project Milestone / Key Tasks – Measures how well PMs create and manage Milestones / Key Tasks.
- Project Schedule Variance – Measures how effectively PMs manage their schedules.
- Project Effort Variance – Measures how effectively PMs manage their project efforts.
- Project Budget Variance – Measures how effectively PMs manage budgets or cost plans.
- Project Unfilled Roles – Measures project roles with allocations that are already started or starting within the next 30 days.
- Project Data Quality – Measures how effectively PMs complete the Description, Stage, Progress, Objective, and Sponsor/Business Owner fields.
- Project Commitment – Measures the hard allocations for a project over a two week time frame.
- Resource Clarity Usage – Measures how often users log into Clarity.
- Resource Timesheet – Measures if timesheets post in a timely manner.
- Resource Allocation – Measures how well RMs keep total resource allocations within the expected range for future time periods.
- Resource Actualy Utilization – Measures how well Resource allocations match actuals.
- Resource Allocation Date in the Past – Measures how many resources are open for time entry with dates in the past.
- Resource Data Quality – Measures how well RMs complete the Resource Manager and Primary Role fields and optionally the Skill and Employment Type fields.
- Resource Commitment – Measures how much resource available time is committed to projects.
-
 Effective resource management is vital for delivering successful and profitable projects. Get it right and costs will be controlled, objectives achieved, and deadlines met. Get it wrong and we run the risk of not just project timescales slipping but also margins and competitive advantages eroding. This paper looks at resource management best practices and how we can adopt practices to increase project quality, agility, and efficiency. This White Paper is downloaded from the Rego Consulting site. You will be asked to provide your email address and current ppm tool. - http://info.regoconsulting.com/smarter-resource-mgmt-whitepaper ** No Download - Do not Add to Cart **
 -
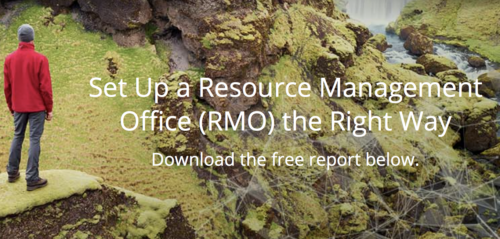 Resource Management - Are You Doing it Right? Companies of all shapes and sizes need to know if they have the right people working on the right things at the right time, to meet their objectives. Rego's own Grant Zemont has put together this report to help your company learn the best practices for setting up a resource management office correctly. Download the free report here. This White Paper is downloaded from the Rego Consulting site. You will be asked to provide your email address and current ppm tool. - http://info.regoconsulting.com/rmo-report ** Do not Add to Cart - No Downloadable File**
 -
 The interface runs using a MS Excel template called Project Allocation Upload that will be distributed to users.
- Configuration
- A master object called Allocation Upload Files will be created. The object will contain a required attachment field on the create page that will receive the Project Allocation Upload MS Excel file.
- A new sub-object called Allocation Upload Records will be created. This object will contain the fields necessary to receive the data rows from the Project Allocation Upload template.
- The master object will store the file level data while the sub-object will store the rows that belong to the file.
- Users must be granted security to view and edit the master and sub-objects in order to run the upload process.
- Project Allocation Upload Template
- The Project Allocation Upload template must remain static. Any changes other than creating additional time periods or additional rows will cause the process to error.
- Only the Project Allocation Upload template can be used to load records to the new objects.
- The Project Allocation Upload will only accept months across the x-axis in the format DD/MM/YYYY. The month headers must appear in the first row of the template and contain the first day of the month.
- The template must be distributed to the users that will be using the upload functionality.
- Users will be required to enter an Investment ID and Resource ID so the process can correctly identify investments and resources to upload the allocation hours against.
- A Staff OBS is not required but can be populated by users to have the data uploaded into CA PPM.
- The owner of the Project Allocation Upload template is responsible for providing users a valid list of Staff OBS Units.
- Investments will not be created through the interface. As such a valid Investment ID must be provided.
- Resources can be added to the investment team through the interface. If a valid Resource ID is provided the resource’s allocation will be updated if the resource already exists on the investment. If the resource does not already exist on the investment the resource will be added to the team along with the allocation hours.
- The Project Allocation Upload template will accept hours, not allocation percentages. Because CA PPM stores allocations as percentages of a resource’s availability the upload process must convert hours to a percentage. As a result small rounding errors may occur in the neighborhood of .01 hours per month.
- Resources cannot be removed from investment teams through the interface.
- The Project Allocation Upload template will support allocation uploads to different instances of the same role on the same investment as long as different Staff OBS units are provided.
- If multiple instances of the same role are assigned to the investment with the same Staff OBS the process will not know which instance of the role to upload the hours to. In these cases the process will consider these records as invalid. The PM will need to manually remove one of the instances or upload the hours manually..
- If multiple instances of the same role with the same Staff OBS unit are assigned to the same investment in the upload template the monthly hours will be totaled by investment, by role, by Staff OBS.
- The allocation template will follow the format in the screenshot area.
- Process
- To initiate the Allocation Interface a user will create a new Allocation Upload File instance, attach the Project Allocation Upload Template, and save the record. The file attachment field is an “enter-once” field, meaning that once a value has been set it cannot be changed. If a user wishes to upload another field they will create a new record.
- After the file has been attached the user will be presented with two check box fields, one to Validate and one to Validate and Upload. Checking either or both options will initiate the process.
- The process will first determine if any sub-object instances exist for the file. In other words, do any records already exist in the Allocation Upload Records sub-object pertaining to the newly uploaded file. If there are no records in the sub-object the process will use the uploaded file and read its contents into the sub-object. If errors are encountered during the file read they will be written to the process console, the process will throw an error, and end.
- Next, records will be validated. Only the sub-object instances that belong to the master object will be validated. Records belonging to other master object instances will not be validated or processed. All records in a status of Ready for Processing, Failed Validation, or Xog Load Error will be validated. Records will fail validation if an investment is not found corresponding to the investment ID provided, a resource is not found corresponding to the resource ID provided, or the date provided is not valid, or a provided Staff OBS does not yield a match. Records that fail validation will be flagged as invalid along with a description as to why they failed validation. Records that pass validation will be flagged as Ready for Processing and locked. The sub-object instances can be exported to excel if further analysis is required. If the Validate & Upload option was not selected the process will end here.
- Regarding the Staff OBS. Only one OBS can be designed as the OBS that the interface will use to validate the Staff OBS records.
- The Staff OBS value from the template must match against the name of an OBS node in the designed Staff OBS.
- If the Staff OBS value matches against multiple nodes in the Staff OBS the record will be flagged as invalid as the process will not know which node to use.
- If the Validate & Upload option was selected the process will continue and any valid records will be xog’ed into the investment team. The xog will be executed as the user that initiated the process so any security rules enforced by xog will be respected by the process.
- Successful records will be flagged as Processed Successfully in the sub-object and remain locked. Records that did not load successfully, due to a xog error or security limitation will be flagged as Xog Load Error, unlocked, and updated with a description containing the full xog output.
- Records that failed validation or failed the xog load can be manually edited and revalidated, and attempt to be uploaded again. Subsequent runs of the process will not read in data from the file, but rather process only sub-object instances that currently exist.
- Configuration
-
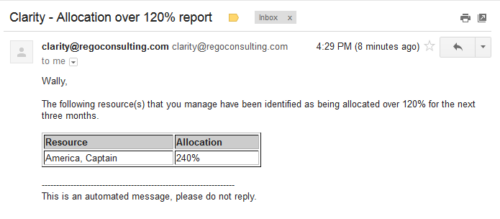 Based on the pre-determined schedule frequency, this job will send an email to Resource Managers that have a Resource meeting the criteria of: Average allocations are greater than 120% where Resource(s) and Project(s) are active over the next 90 days. This serves as a reminder to Resource Managers to monitor and manage allocations. The contents of the email include a message indicating the Resource Manager has at least one Resource meeting this criteria and a table indicating the Resource and that resource’s average, next 90 days allocations.
 -
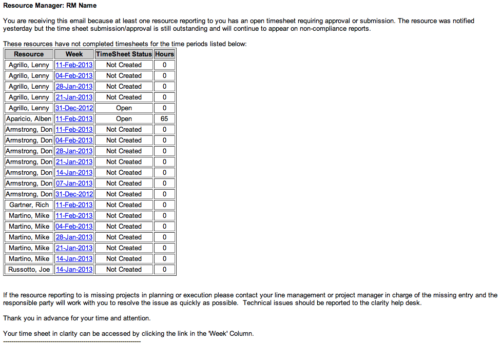 The Time Tracking Stalker - RM workflow process automatically sends an email to Resource Managers for each one of their resources that have not submitted their timesheet for a prior open time period, thus informing the RM if their resources are submitting their timesheets on time. Project Managers will also benefit since the notifications will help to ensure that time is being posted against their projects in a timely manner, helping to provide them with an accurate view of time expended on the projects.
 -
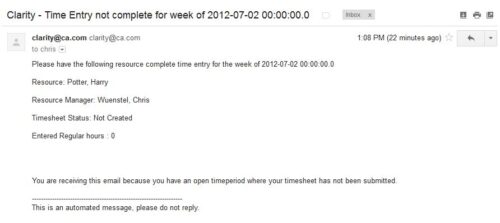 The Time Tracking Stalker – Resource workflow process is used to notify resources that fail to submit a timesheet in a prior week. The workflow checks for active resources, hire/termination dates, track mode, and open for time entry. This process helps to ensure resources submit timesheets in a timely manner. In version 13, the email can be enhanced to include colors, bold, underline, and other HTML formatting.
 -
 Course Description: This class will provide a list of daily and weekly activities that every resource manager should follow to leverage Clarity PPM more effectively.
 -
 Are you starting a resource management implementation, or do you want to compare how you are using these functions vs. others or best practices? In this class we will discuss some best practices from successful customers.
 -
 Have you looked in the regoXchange or reviewed Rego’s innovation offerings? This class will show you the power of Rego’s pre-built content library, integrations, and other assets. See example after example of portlets, processes, and materials you can use to add value to your instance of Clarity. Learn how you can introduce email-based approvals with Rego's action item responder. Get a peek at Rego's new MSP integration that avoids the issues faced with the OOTB integration. Finally, understand Rego's pre-built connectors and how they can benefit your instance. Including blueprint migrator. Include free tools like GEL builder, query, XOGbridge.
 -
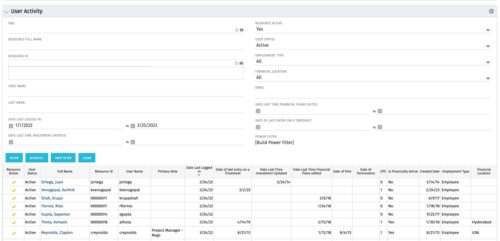 The User Activity portlet is in essence an expansion of the out of the box User List by License Type portlet, which only display the Last Logged In date of resources. This portlet offers several additional fields to help admins dig deeper into user activity within the tool. The table below describes the available filter fields for the portlet.
Column Label Description OBS OBS the resource(s) belong to Resource Full Name Resource’s First and Last Name Resource ID Resource’s ID First Name Resource’s First Name Last Name Resource’s Last Name Date Last Logged In Date the Resource last logged in Date Last Time Investment Updated Date the Resource last made an Investment update Resource Active The Resource’s active status Employment Type Resource’s Employment Type Financial Location Resource’s Financial Location Email Resource’s Email Address Date Last Time Financial Plans Edited Date the Resource last made a Financial Plan edit Date of last entry on a Timesheet Date the Resource last made an entry on a timesheet Created Date Date the resource was added to the system Date of Hire Resource’s Date of Hire Date of Termination Resource’s Date of Termination Financial Department Resource’s Financial Department Home Page Resource’s Home Page Language Default Language of the Resource Primary role Resource’s Primary Role Resource manager Resource’s Manager Track Mode Resource’s Track Mode User Name Resource’s Username


Copyright 2023 • Rego Consulting Corporation • Privacy Policy