-
 This training document is a Rego Consulting Quick Reference Guide to assist with the management of Budget Plans in Clarity’s Modern User Experience. This doc references version 16.3 views. Doc provides detail on how to submit a cost plan for approval, how to approve or reject submitted budgets and also provides additional detail on the rules that apply to the submission of budget plans.
 -
This training document is a Rego Consulting Quick Reference Guide to assist with Project creations in Clarity’s Modern User Experience. This doc references version 16.3 views. Doc covers create project from project page, create project via the New from Template button, selection of template and project creation from the project tile view.
-
 This training document is a Rego Consulting Quick Reference Guide to assist resource managers with the adjusting of timesheets. This doc references version 16.3 views. Document provides guidance on how to use the Review & Approve tab to adjust time that has already been entered by a resource.
 -
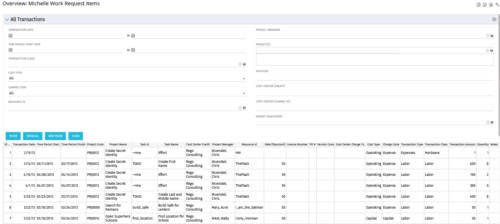 The All Transactions portlets have the capability to display any transaction within the system. Transactions from any type of investment can be viewed on this page. There are two version of this process:
- All Transactions (with security) – this will display rows only where the logged in resource has access to cost plans for projects or ideas. The portlet will check instance, OBS and global rights.
- All Transactions (without security) – will display all rows, regardless of cost plan access rights.
Column Label Description ID An unique identifier for each row displayed in the portlet. Transaction Date The data the transaction has been coded to. Time Period Start For transactions arising from timesheet entries, this will show the start period of the timesheet. Time Period Finish For transactions arising from timesheet entries, this will show the finish period of the timesheet. Project Code The ID of the investment. Project Name The name of the investment. Task ID The ID of the investment task where the actual cost has been assigned. Task Name The name of the investment task where the actual cost has been assigned. Cost Center Credit The department assigned to the resource where a cost needs to be credited. Project Manager The resource managing the investment. Resource ID The ID for the resource that has been assigned the cost. Rate (Standard) The rate for the cost. Invoice Number The invoice number. May come from a manual transaction or may be imported from a financial system integration. PO # The purchase order number. May come from a manual transaction or may be imported from a financial system integration. Vendor Code The vendor code that has been listed against the transaction. Cost Centre Charge To The department assigned to the resource where a cost needs to be charged. Cost Type Indicates whether the transaction is capital or operating. Charge Code The charge code assigned to the transaction as per the Clarity Charge Code list. Transaction Type Labour, Expense, Equipment or Material. Transaction Class The transaction class assigned to the transaction as per the Clarity transaction class list. Transaction Amount Rate x Quantity. Quantity The number of units. Notes Free text field for the transaction. -
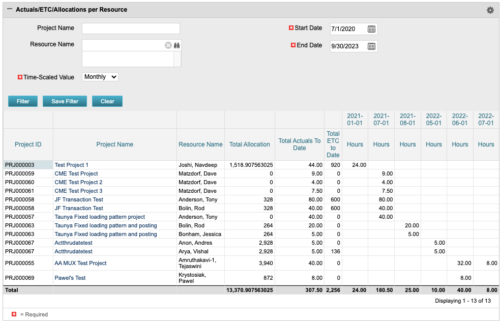 The portlet displays posted time by project for the logged in user based on time period and date range. This allows the user to see at a glance their ETC and actuals on the projects. The portlet displays the Total Allocation and Total Actuals to Date for the user on the projects they are allocated/assigned to. The actuals are displayed per month in the form of TSVs.
 -

This course will provide an overview of CA PPM Demand Management functionality. Topics include: - What is Demand Management?
- Accessing and Creating Ideas
- Staffing the Idea Team
- Creating and Approving Idea Financial Plans
- Idea Conversion to another Investment Type
- Accessing and Creating Incidents
- Adding Incident Tasks to a Project
-
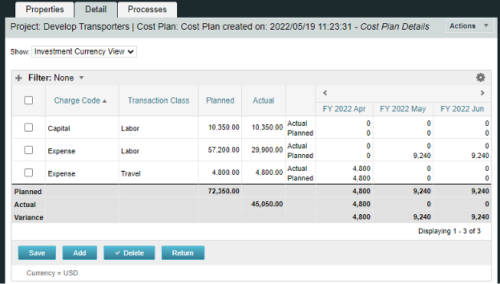
A process creating a new Cost Plan. Cost Plan properties:
Pre-conditions:Name Cost Plan created on: yyyy/mm/dd hh:mm:ss Grouping attributes Charge Code, Transaction Type Start Period The earliest fiscal period with Actuals (from PPA_WIP table) or current period, if there are no actuals Finish Period The latest fiscal period with a non-zero allocation (from PRJ_BLB_SLICES table, SLICE_REQUEST_ID = 6 Period Type Monthly Plan of Record True Planned Cost For periods in the past – from Actuals (Charge Code, Transaction Type, Quantity (Units), Cost (Amount) taken from Transactions (PPA_WIP & PPA_WIP_DETAILS); For current and future periods – from Allocations (Charge Code taken from the Project, Transaction Class from the Resource, Quantity from allocation slices, Cost from the Rate Matrix (NBI_PROJ_RES_RATES_AND_COSTS table) - the Project must be financially enabled.
- if a new Team Member is added, Rate Matrix job must be run, so the rates are populated in the NBI table.
- if the Allocation changes, allow the timeslice job to finish before running the process.
- the Project should have the Charge Code set.
-
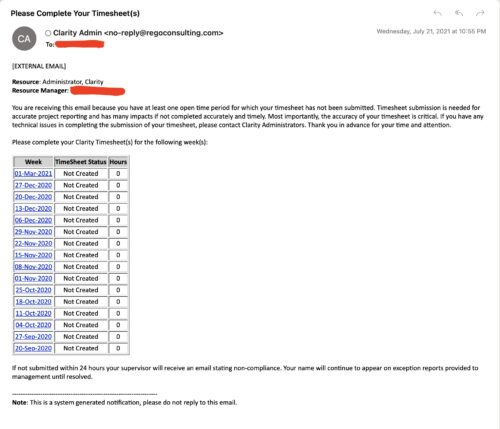 The Enhanced Time Tracking Stalker – RM workflow process automatically sends a single email to Resource Managers which contains a list of any of their resources that have not submitted their timesheet for a prior open time period. The email informs the RM if their resources are submitting their timesheets on time. The email includes a table that provides this information for each resource: Resource Name, Time Period, Timesheet Status and Total Hours saved on the timesheet with links to the timesheet in the Modern User Experience of Clarity. These notifications will help to ensure that time is being posted and approved in a timely manner.
 -
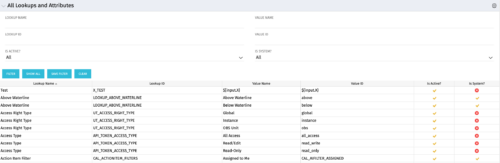 The All Lookups and Attributes portlet provides the ability to see all static lookups in the system, as well as their lookup values. Ability to filter and view the population by lookup name and ID, value name and ID, whether or not the item is active, and whether or not the item is a system (seeded) value. A system value is a record that comes with a base installation of Clarity as opposed to a value that was added manually or through a Clarity Add-in.
 -
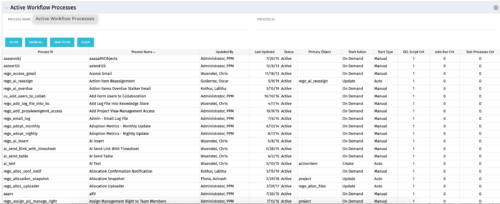 The Active Workflow Processes allows you to view all of the workflow processes within the system. It shows information about the process: the objects related, the start type, and if the process has sub-processes, jobs, or GEL scripts. This portlet is used by admins to determine how many processes are currently running in the system and on which objects. It will also display the start action, how many GEL scripts reside in the process, the run count and how many the sub-processes each process has. This information is helpful during upgrades and other testing.
 -
 A Quick Reference Guide to assist in the use of the Objectives Grid view. The Objective grid provides the ability to create new Objectives, filter, add fields to the gird, save and load views, export the list of hierarchies and review the details of an Objective.
 -
A Quick Reference Guide to assist in the process of associating an OBS with User Access in Clarity’s Modern User Experience. An Organizational Breakdown Structure (OBS) can be used for user access control. Perform these steps if the OBS is required for managing access rights for objects such as resources and investments. Note: the following steps apply to non-financial OBSs and the OBS must exist in the system.


Copyright 2023 • Rego Consulting Corporation • Privacy Policy