-
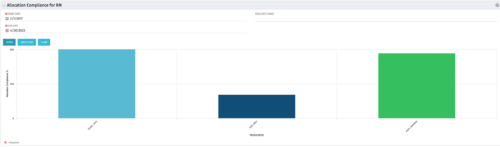 The Allocation Compliance by Resource (Resource Manager) portlet gives a view of resource allocation compliance for all active resources the logged in user is the Resource Manager for. It allows the RM to see resources they manage over the coming months and whether they are over or under allocated. This portlet leverages the daily allocation and daily availability slices as well as only active investments. The portlet provides filters for specific dates, filtering by resource ID, and resource name may also be added.
 -
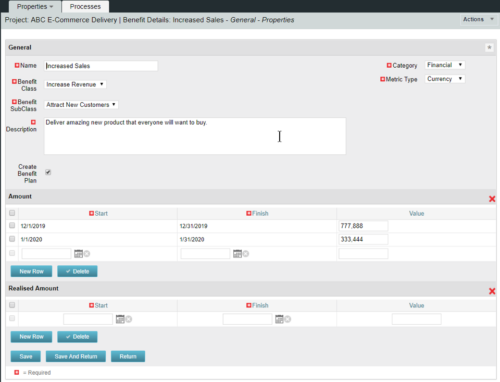 This configuration and accompanying process allows users to capture Financial and Non-Financial (Metrics, Soft, etc.) Benefit in a custom sub-object, then programmatically create an out-of-the-box Benefit Plan with just the Financial Portion from the custom sub-object. The solution is comprised of:
- Sub-Object (Benefit Plan Details, Parent = Project)
- Process: Create Benefit Plan (uses sub-object as primary input, native BP is output)
- Process: Update sql - Cost Benefit Plans (one-time script to update Projects)
- Ensure on the Benefit Details List view the Planned and Realized Amounts are displayed
- Modifying the Create Benefit Plan Process in support of a BP naming convention consistent with local PMO Practices
- Modifying the Create Benefit Plan Process to link the BP to the Cost Plan of Record
- Creating a Portlet that pulls together rows of data from the sub-object across multiple projects in a summarized view as well as a detailed view
-
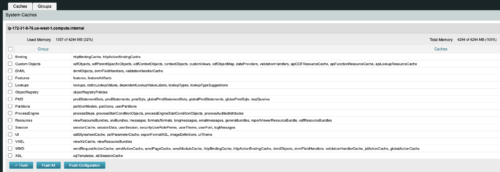 The CA Clarity Hidden Page Flush Caches document provides an overview of how to clear the cache on an application server without exiting the CA Clarity Application itself utilizing a hidden page within the system.
 -
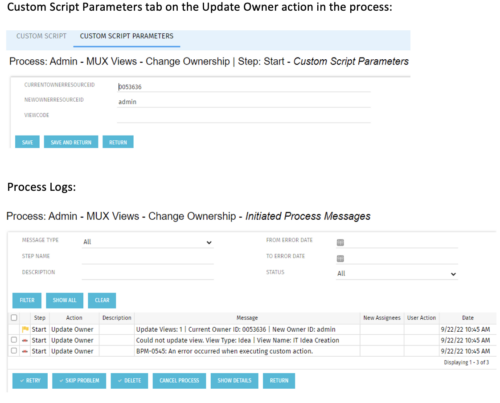 This is a standalone process that can be run by an admin to change the ownership of MUX views from a specified user to another specified user. The process contains a single custom script, which has the following parameters that must be updated prior to running the process:
- currentOwnerId (required): Resource ID for the current Owner (unique_name from srm_resources table)
- newOwnerId (required): Resource ID for the new Owner (unique_name from srm_resources table)
- viewCode (optional): Code for the specific view to update - leave blank if you want to transfer ownership for all views (odf_ui_views.code)
- Navigate to the process called Admin - MUX Views - Change Ownership.
- Navigate to the Start Step tab, Click on the Update Owner action, and click the Custom Script Parameters tab.
- Enter the Resource ID for the current view owner into the currentOwnerId parameter.
- Enter the Resource ID for the new owner into the newOwnerId parameter.
- If you want to update a specific view only, enter that in the viewCode parameter.
- Run the process via Organizer in Classic.
-
 Over time notifications can build up in the CA PPM system and should be purged, so as not to hinder performance. The SQL statements mentioned in the tech doc can be implemented within a process in CA PPM to either purge notifications on an ongoing basis or remove all of them at once.
 -
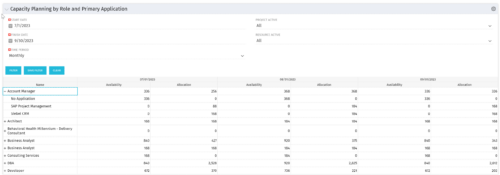 This portlet pulls back the Availability and Allocation totals by Role between a user-specified Start and Finish Date, then the user can drilldown to look at the information for Applications. The Time Period filter allows for comparing these values across different timeframes (monthly, weekly, quarterly, annual) as desired. Other filters allow for looking at Active or Inactive Roles (or both) and including Active or Inactive Projects (or both) in the totals.
 -
 This video describes the process to Autoschedule a project using OWB. The video is available in both .m4v and .wmv formats.
 -
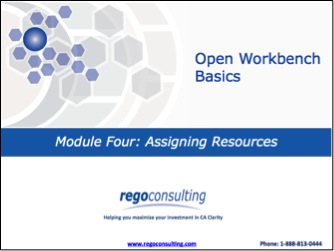 This video describes the process to assign resources to tasks within OWB. The video is available in both .m4v and .wmv formats.
 -
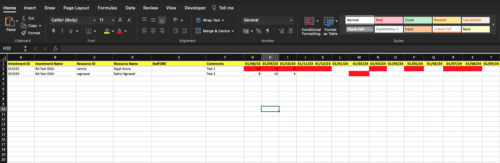
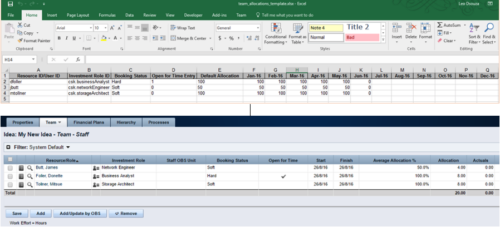 The idea allocation uploader allows you to import in allocations from an external Excel spreadsheet. Populate an Excel template with required fields then import them directly from the Clarity UI. Once imported you’ll see the allocations right on the Team tab of the Idea.
 -
 The Current Proxies portlet provides a user with an overview of all the resources in the system currently using a proxy. This portlet is helpful to determine a proxy if a user is currently out of the office. The portlet provides several pieces of information related to the resource including: resource names, proxy, start date, end date, days remaining, total days, and if the proxy is active. The user may filter by resource name, proxy name, proxy status (defaults to Yes), and start/end dates (defaults to the current date).
 -
 Rego’s training video that walks through the Time Entry and Approval process for Clarity PPM – Modern User Experience. This video was created using Clarity PPM version 15.6.
 -
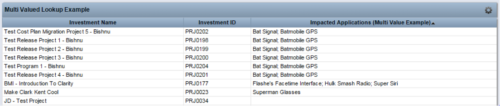 The Concatenate Multi-Value Lookup into One Field for Display Purposes technical trick provides an overview of how to group or concatenate the various levels and values of a Multi-Value lookup into one field in both Oracle and SQL Server environments. This allows the lookup values to be more easily displayed in a portlet. The function concatenates the values together using a choice of delimiter, which then allows the multi-value lookup to be viewed as one portlet column, in the same manner as any other object attribute.


Copyright 2023 • Rego Consulting Corporation • Privacy Policy