
- Object Name – The name of the object to which the attribute belongs
- Object Code – The external ID of the object to which the attribute belongs
- Attribute Name – The name of the attribute
- Attribute Code – The external ID of the attribute
- Partition Code – The partition to which the attribute belongs
- Table Name – The database table where the attribute is located
- Column Name – The database column name of the attribute
- Data Type – The data type of the attribute
- Data Size – The character limit of the attribute
- Data Scale – The scale of numeric attributes
- Is Active – Specifies if the attribute is active
- Extended Data Type – The extended type of the attribute (ex: lookup, money, etc.)
- Lookup Name – The name of the attribute’s lookup
- Lookup Type – The external ID of the attribute’s lookup
- Default Value – The default value assigned to the attribute
- API Alias – The REST API alias assigned to the attribute
- Max Value – The maximum value accepted by the attribute
- Min Value – The minimum value accepted by the attribute
- Curve Name – The name of the Curve for Time-Scaled value attributes
- Curve Type – The type of the Curve for Time-Scaled value attributes
- Is Custom – Is the attribute a stock attribute or custom
- Is Auto-Numbered – Is auto-numbering enabled for the attribute
- Is Multi-Valued – Is the attribute a multi-valued lookup
- Is DWH Enabled – Is the attribute enabled for export to the data warehouse
- Is Editable – Is the attribute editable or read-only
- Is Required – Is the attribute required
- Is Virtual – Is the attribute a virtual attribute
- Is Private – Is the attribute a private attribute used by the application behind the scenes
-
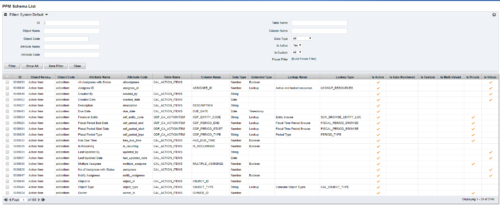 The PPM Data Dictionary Extractor pulls schema and attribute information from each object in CA PPM and places it in a custom object. The following fields provide details information about each attribute in the CA PPM Instance.
 -
 This can be used to remove all participants and their corresponding security permissions. NOTE: The ability to remove the right is with the admin only.
 -
This can be used to remove all participants and their corresponding security permissions. NOTE: The ability to remove the right is with the admin only.
-
 This can be used to remove all automatic permissions (Project Manager Auto) granted to users as a result of becoming a project manager. NOTE: The ability to remove the right is with the admin only.
 -
This can be used to remove all automatic permissions (Project Manager Auto) granted to users as a result of becoming a project manager. NOTE: The ability to remove the right is with the admin only.
-
This can be used to remove all automatic permissions (Project Manager Auto) granted to users as a result of becoming a project manager. NOTE: The ability to remove the right is with the admin only.
-
 This can be used to remove all automatic permissions (Resource Manager Auto) granted to users as a result of becoming a resource manager. NOTE: The ability to remove the right is with the admin only
 -
This can be used to remove all automatic permissions (Resource Manager Auto) granted to users as a result of becoming a resource manager. NOTE: The ability to remove the right is with the admin only
-
This can be used to remove all automatic permissions (Resource Manager Auto) granted to users as a result of becoming a resource manager. NOTE: The ability to remove the right is with the admin only
-
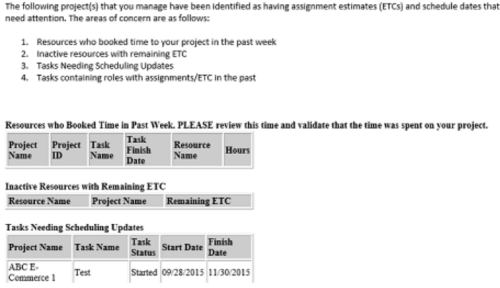 “PM Stalker – Project Validations & Issues” executes various queries against the Clarity database and sends an email to all PMs who have one or more projects with any of the following conditions:
- Resources have booked time in the past week (validation needed)
- Inactive Resources with ETCs still on the project
- Tasks past their Finish Date but not completed
- Task Role Assignments in the past
-
“PM Stalker – Project Validations & Issues” executes various queries against the Clarity database and sends an email to all PMs who have one or more projects with any of the following conditions:
- Resources have booked time in the past week (validation needed)
- Inactive Resources with ETCs still on the project
- Tasks past their Finish Date but not completed
- Task Role Assignments in the past
