-
 Course description: “Are some of your users leveraging a Smartsheet add-on for project planning, or are you looking for an alternative to OWB and MSP? Learn how this new scheduling tool is making waves and adding value for project managers working within Clarity.” Download file is the presentation slidedeck.
 -
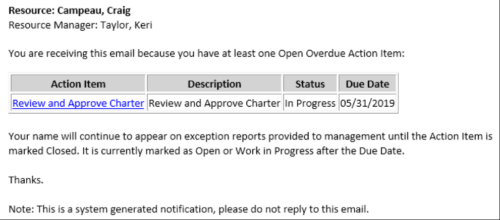 This Process sends an email to every Action Item Assignee where the Due Date/Time has passed and the Status is either Open, or In Progress. Users may want to modify this stalker to include Status = Deferred. In addition, the Resource Manager for the Assignee receives a copy of the email. In order to generate emails, the SMTP gateway must be up and running and Resources must have a valid email address.
 -
 The process is built to clear the random timesheet locks that happens occasionally. There are three Processes and one lookup component and one job definition in the package.
- PRLock (Timesheets) Record Removal (ID: rego_prlock_rec_rmvl). This process requires PRNAME, PRTABLENAME and PRRECORDID from PRLock Table.
- The Lookup PRLock Check (Timesheet) (Id: REGO_PRLOCK_CHECK) should be used to update the GEL parameters for the above process.
- PRLock (Timesheets) Record Removal All (ID: rego_prlk_rc_rmv_all) This deletes ALL prtimesheet locks.
- Rego Remove Timesheet Locks (ID: rego_rmv_ts_locks). This process is run as a job “PrLock Clear for Timesheet Locks” which performs the same functionality as the above two processes. The process and job definition are separate XOG files.
- PRLock (Timesheets) Record Removal (ID: rego_prlock_rec_rmvl). This process requires PRNAME, PRTABLENAME and PRRECORDID from PRLock Table.
-
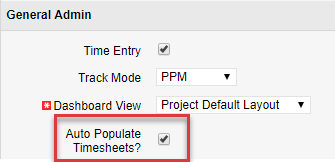
 The Populate Timesheets process converts task level ETC into time entered on the timesheet. The process relies on the resource “opting in” to the process by checking a new attribute called “Auto Populate Timesheet?”, as well as the project manager “opting in” at the project level via a new attribute called “Auto Populate Timesheet?” Once the resource opts in and the PM opts in, the process will create a timesheet for the resource, pulling in the ETCs for the tasks that week and moving them to the actual hours. Once the process runs, an email will be sent to the resource letting them know the hours have been applied.
 -
 The Unlock Projects workflow process can be run through the "Execute a Process" job. The workflow will execute a query that will automatically unlock projects that have been exported / checked out for over 2 days. This prevents any projects from remaining in the “locked” state for a long period of time, preventing time from posting to these projects.
 -
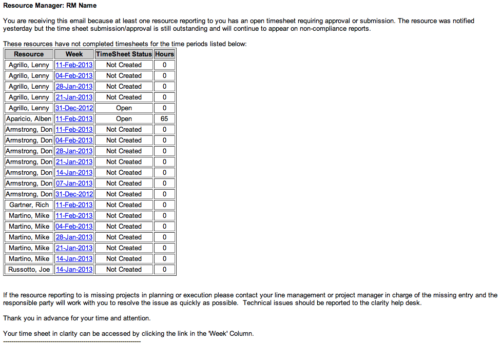 The Time Tracking Stalker - RM workflow process automatically sends an email to Resource Managers for each one of their resources that have not submitted their timesheet for a prior open time period, thus informing the RM if their resources are submitting their timesheets on time. Project Managers will also benefit since the notifications will help to ensure that time is being posted against their projects in a timely manner, helping to provide them with an accurate view of time expended on the projects.
 -
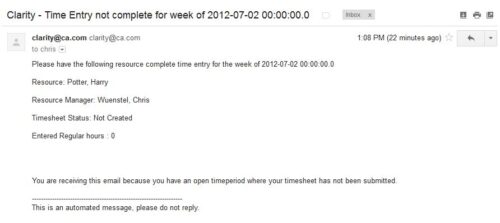 The Time Tracking Stalker – Resource workflow process is used to notify resources that fail to submit a timesheet in a prior week. The workflow checks for active resources, hire/termination dates, track mode, and open for time entry. This process helps to ensure resources submit timesheets in a timely manner. In version 13, the email can be enhanced to include colors, bold, underline, and other HTML formatting.
 -
 The Status Report Publish workflow process pushes values from the status report sub-object to the parent project object. The process is started when the user ticks the “Publish” Boolean field on the status report (custom field added). This workflow will update the project object with the overall status indicator, the status comment, the previous overall status, and the as of date. This eliminates the project manager having to update the fields in both the status report and the project overall.
 -
 The Re-Baseline via Change Request process is a simple method for a member of the project (who has the ability to create change requests) to request a re-baseline of the project without the project manager having to perform it. First, the user must create the change request. The user must then start the process within the change request by using the Processes tab. Once started, the process will route an action item to the Project Manager. If rejected, the process will end and the user must start it again (if needed). If approved, the process will then baseline the project and close out the change request.
 -
 There’s an upgrade in your future. Do you want to understand the costs, durations, and lessons learned? We’ll review existing and upcoming releases, the pros and cons of moving to various versions, and upgrade strategies, so you can prepare your budget and plan.
 -

- ITFM Introduction
- PMO & IT Finance Collaboration
- Where ITFM and PPM Meet
- Connecting PPM with ITFM
-
 Course Description: Struggling to figure out how to best organize your blueprints? This class will walk through best practice blueprint design, including how many to have, how to use channels, using custom subobjects within the blueprint, and swapping blueprints at various project stages to mimic project phases or ideas. We’ll highlight some of the creative ways we’ve seen blueprints used in client implementations.


Copyright 2023 • Rego Consulting Corporation • Privacy Policy