- Organize Portfolios
- Define Portfolio Properties
- Build Portfolio Contents and Synchronization
- Define Portfolio Targets
- Utilize the Portfolio Waterline
- Ranking Investments
- Scenario Planning
- Portfolio Analysis and Outputs
-
 Rego’s training materials for Managing Portfolios in Clarity. The slide deck was put together using Clarity version 15.4.1. This course will describe how to:
 -
 Rego’s course materials for managing projects with Clarity PPM. This slide deck is created using Clarity version 15.6 and focuses on the Classic user interface. The course material covers the following:
- Project Management Overview
- Managing Projects
- Staff the Team
- Work Breakdown Structure (WBS)
- Resource Assignments to Tasks
- Clarity PPM Autoschedule
- Financial Management
- Risks, Issues, and Change Requests
- Controlling a Project
- Program Management
- Portlets and Reports
- Clarity PPM New UX – Life of the PM Interface
-
 A presentation slide deck from Rego University 2022. This document reviews the options for managing schedules outside of the Clarity tool.
- Introduction to scheduling
- Why use an external scheduler?
- Who uses what?
- Scheduler-Specific Decision Factors
- Discussion: Scheduler Challenges
- Tips to help user adoption
- Is it time to just use Clarity?
- Microsoft Project OOTB or The Rego Connector?
-
 How do I mature my portfolio planning? What is my organization's next steps in maturing our portfolio planning processes, and how can CA PPM or other tools help? This class will review industry trends related to portfolio planning and talk about what each organization should aspire to portfolio processes.
 -
 Are you struggling with Apptio user engagement and adoption? Do you struggle to get stakeholders to provide data or executives to log in to Apptio? If you've spent time, energy, and funding to develop a great TBM program but are not seeing the engagement you want, this session is for you. We will show you how to drive Apptio adoption and improve stakeholder engagement.
 -
 Looking for metrics that you can implement immediately in CA PPM? This class will be a working session to review all of the content available out of the box and within the CA and Rego content packs. This will provide you the options for metrics the represent industry best practice without the costs to develop them.
 -
 See how multiple Rego innovations can save time, reduce effort, and increase adoption across your organization. Leverage Power Automate to connect Clarity with SharePoint, Teams, and Outlook—automating tasks like creating Teams for projects, managing permissions, and sharing reports with non-Clarity users. Discover how the RegoLink PowerPoint add-in keeps decks up to date with templates and live Clarity data, and how the Excel Data Manager (EDM) simplifies bulk updates by letting you edit and validate data in Excel before syncing back.
 -
 Are you still using Clarity's classic User Experience? Are you getting behind on leveraging Modern UX capabilities? This class will be a practical guide on how to move your users to the Modern UX. We will discuss real use cases and help provide guidance on this strategic decision. We also plan to have a portion of the class dedicated to Q&A with customers that have already migrated.
 -
 Are you still using the classic User Experience? Are you wondering how and when you should transition to the ModernUX? This class will be a practical guide on how to move your users to the ModernUX. We will discuss real use cases and help provide guidance on this strategic decision. We also plan to have a portion of the class that is Q&A from customers that have moved.
 -
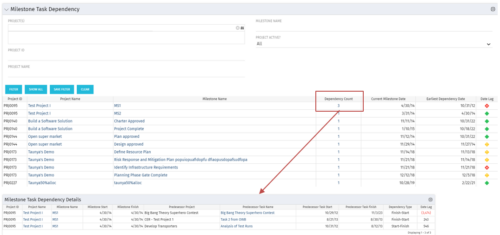 The Milestone Task Dependency portlet shows the milestone task dependency count and has a drilldown to the details. The portlet looks at the dependency impact on milestones, and is not limited to just dependencies that are on different projects. The lag days calculation is based off of the maximum dependency impact and the drilldown portlet (Milestone Task Dependency Details :::: rego_milestone_dependency_det)shows the details for each.
 -
 The Milestone Task Dependency portlet shows the milestone task dependency count and has a drilldown to the details. The portlet looks at the dependency impact on milestones, and is not limited to just dependencies that are on different projects. The lag days calculation is based off of the maximum dependency impact and the drilldown portlet (Milestone Task Dependency Details :::: rego_milestone_dependency_det)shows the details for each.
 -
 Most leaders in this current climate understand the need for more agility, but don't always understand the changes necessary for this. New ways of working require a new mindset and new behaviors. In this session you'll learn about some of the critical mindset and behavioral shifts that are important for leaders as well as what types of conversations need to take place with various stakeholders to put your teams on the path to effective agility.
 -
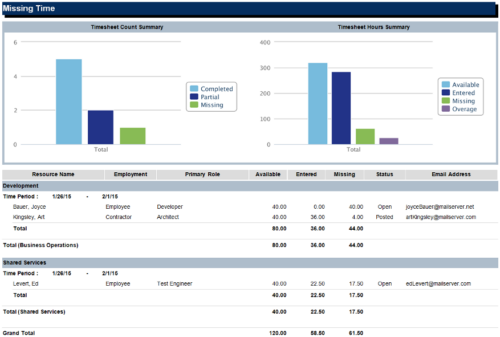 The Missing Time report is a transaction based Jaspersoft report that does not require the Load Jaspersoft Datawarehouse job to be run. The report will pull real-time data from the transaction tables in Clarity. This report can be run from either the Advanced Reporting or Reports and Jobs area within Clarity. The Missing Time report displays resource available hours, timesheet hours entered, and timesheet hours missing by resource and time period. The report can be grouped by resource manager or OBS level. The report also has an option to calculate missing time based on timesheet status or resource availability. The charts include a summary of timesheets across the periods included in the report. The Timesheet Count Summary displays the number of timesheets that are completed, partially completed, or missing for the time periods. The Timesheet Hours Summary displays the number of hours grouped by resource availability, timesheets entered, timesheets missing, and overage.
 -
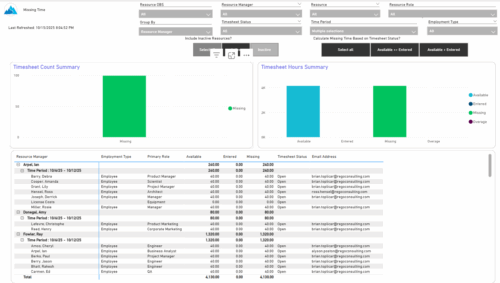 The Missing Time report provides insight into timesheet compliance by comparing available hours, entered hours, and missing hours for each resource over a selected time period. It can be grouped by resource manager or OBS level and offers flexibility to calculate missing time based on timesheet status or resource availability. The report includes summary charts showing timesheet completion rates and total hours, highlighting completed, partial, and missing timesheets as well as overages across reporting periods.
 -
 The Missing Time by OBS portlet displays all missing or late timesheets for resources staffed within a specific OBS. Resources will be included if they are open for time entry, have the track mode of ‘Clarity’ and have a timesheet that is not posted. The portlet accommodates for hire and termination dates. Also, the portlet only shows resources that the active user has the security rights to view. Administrators and the Project Management Office may use this portlet to determine the timesheet status of all resources within a specific OBS in open time periods. This portlet allows a user to quickly search by OBS and view all timesheets under that area. After selecting the OBS, the user can also filter on time period start date, Resource Manager and/or Project Manager. The portlet will display a ‘Stop Light’ indicator based on timesheet status, the status, period start, Resource Name, Resource Manager and any actual hours entered for the timesheet.
 -
 The Missing Time by OBS portlet displays all missing or late timesheets for resources staffed within a specific OBS. Resources will be included if they are open for time entry, have the track mode of ‘Clarity’ and have a timesheet that is not posted. The portlet accommodates for hire and termination dates. Also, the portlet only shows resources that the active user has the security rights to view. Administrators and the Project Management Office may use this portlet to determine the timesheet status of all resources within a specific OBS in open time periods. This portlet allows a user to quickly search by OBS and view all timesheets under that area. After selecting the OBS, the user can also filter on time period start date, Resource Manager and/or Project Manager. The portlet will display a ‘Stop Light’ indicator based on timesheet status, the status, period start, Resource Name, Resource Manager and any actual hours entered for the timesheet.
 -
 The Missing Time by OBS portlet displays all missing or late timesheets for resources staffed within a specific OBS. Resources will be included if they are open for time entry, have the track mode of ‘Clarity’ and have a timesheet that is not posted. The portlet accommodates for hire and termination dates. Also, the portlet only shows resources that the active user has the security rights to view. Administrators and the Project Management Office may use this portlet to determine the timesheet status of all resources within a specific OBS in open time periods. This portlet allows a user to quickly search by OBS and view all timesheets under that area. After selecting the OBS, the user can also filter on time period start date, Resource Manager and/or Project Manager. The portlet will display a ‘Stop Light’ indicator based on timesheet status, the status, period start, Resource Name, Resource Manager and any actual hours entered for the timesheet.
 -
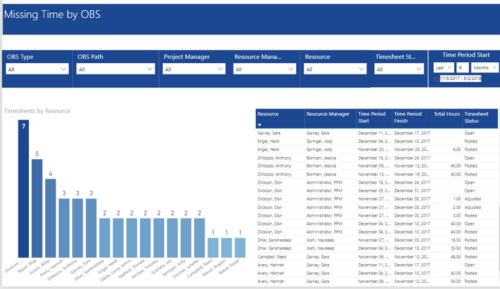 Missing Time by OBS report displays Resource whose timesheets are missed. There is Clustered Column Chart which displays Timesheets count by Resource. Also, there is table view of Resource, Resource Manager, Time Period Start and Finish Dates, Total Hours and Timesheet status. User can narrow their search by OBS Type & Path and Project Manager, Resource Manager, Resource, Timesheet Status and Time Period Start Date (Relative or Specific Date Range).
 -
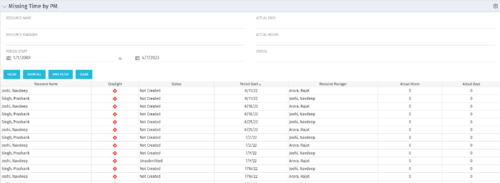 The Missing Time by PM portlet displays all missing or late timesheets for resources staffed on a project where the logged in user is the project manager. Resources will be listed if they are open for time entry, have a track mode of Clarity, and have timesheet that is not posted (accommodates for hire and termination dates). Project managers may use this portlet to determine the timesheet status of resources staffed on their projects. You may narrow the results by filtering by resource manager, period start, resource name, or status. The portlet will display an indicator based on timesheet status, the status, period start, resource name, and actual hours for the timesheet.
 -
 The Missing Time by PM portlet displays all missing or late timesheets for resources staffed on a project where the logged in user is the project manager. Resources will be listed if they are open for time entry, have a track mode of Clarity, and have timesheet that is not posted (accommodates for hire and termination dates). Project managers may use this portlet to determine the timesheet status of resources staffed on their projects. You may narrow the results by filtering by resource manager, period start, resource name, or status. The portlet will display an indicator based on timesheet status, the status, period start, resource name, and actual hours for the timesheet.
 -
 The Missing Time by PM portlet displays all missing or late timesheets for resources staffed on a project where the logged in user is the project manager. Resources will be listed if they are open for time entry, have a track mode of Clarity, and have timesheet that is not posted (accommodates for hire and termination dates). Project managers may use this portlet to determine the timesheet status of resources staffed on their projects. You may narrow the results by filtering by resource manager, period start, resource name, or status. The portlet will display an indicator based on timesheet status, the status, period start, resource name, and actual hours for the timesheet.
 -
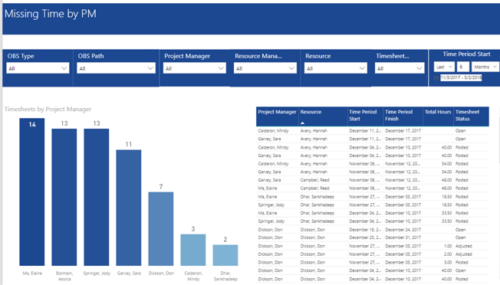 Missing Time by PM report displays Resources whose timesheets are missed by Project Manager. There is Clustered Column Chart which displays missed timesheets count by Project Manager. Also, there is table view of Project Manager, Resource, Time Period Start and Finish Dates, Total Hours and Timesheet status. User can narrow their search by OBS Type & Path and Project Manager, Resource Manager, Resource, Timesheet Status and Time Period Start Date (Relative or Specific Date Range).
 -
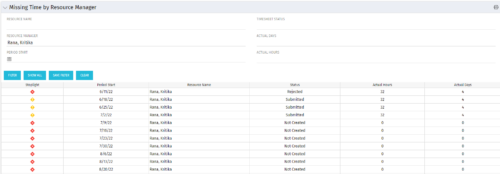 The Missing Time by RM portlet displays all missing or late timesheets for resources for which the logged in user has resources (logged in user is the RM). Resources will be listed if they are open for time entry, have a track mode of Clarity, and have timesheet that is not posted (accommodates for hire and termination dates). Resource managers may use this portlet to determine the timesheet status of all resources in open time periods. The portlet will display an indicator based on timesheet status, the status, period start, resource name, and actual hours for the timesheet.
 -
 The Missing Time by RM portlet displays all missing or late timesheets for resources for which the logged in user has resources (logged in user is the RM). Resources will be listed if they are open for time entry, have a track mode of Clarity, and have timesheet that is not posted (accommodates for hire and termination dates). Resource managers may use this portlet to determine the timesheet status of all resources in open time periods. The portlet will display an indicator based on timesheet status, the status, period start, resource name, and actual hours for the timesheet.
 -
 The Missing Time by RM portlet displays all missing or late timesheets for resources for which the logged in user has resources (logged in user is the RM). Resources will be listed if they are open for time entry, have a track mode of Clarity, and have timesheet that is not posted (accommodates for hire and termination dates). Resource managers may use this portlet to determine the timesheet status of all resources in open time periods. The portlet will display an indicator based on timesheet status, the status, period start, resource name, and actual hours for the timesheet.
 -
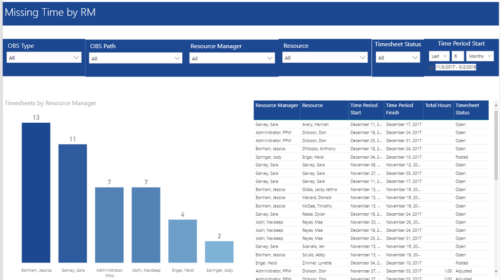 Missing Time by RM report displays Resources whose timesheets are missed by Resource Manager. There is Clustered Column Chart which displays missed timesheets count by Resource Manager. Also, there is table view of Resource Manager, Resource, Time Period Start and Finish Dates, Total Hours and Timesheet status. User can narrow their search by OBS Type & Path, Resource Manager, Resource, Timesheet Status and Time Period Start Date (Relative or Specific Date Range).

