RegoXchange
  • The All Tasks portlet displays all tasks related to active projects that the logged in user has view rights to.  The portlet provides the project manager a single place to view tasks across multiple projects without having to go into each project individually, and allows for more efficient management and reporting across projects. The portlet displays project actuals and estimates from the project (datamart tables). The portlet allows analysis like:
    • PMs may have several critical tasks that were supposed to start on a certain date.  To verify progress, they filter for that start date to perform a review of the tasks.
    • PMs can review days late to see how tasks are doing against the baseline date (<7 days is green, 7-14 is yellow, and >14 is red)
    • PMs can review days old to see how tasks are doing against today’s date (<7 days is green, 7-14 is yellow, and >14 is red)
    The table below describes the available columns in the portlet. The first 10 are configured in the default view:
    Column Label Description
    Project ID Unique project identifier
    Project Name Name of the project
    Project Manager Manager of the project
    Task Name Name of the task
    Task Status Not Started, Started, or Completed
    Task Start Start Date of this task
    Task Finish Finish Date of this task
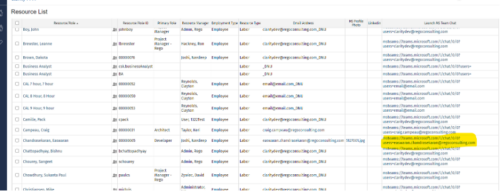
  • Launch a Team chat with your users directly from the Clarity PPM tool. This is a good way to collaborate with the team and users for any quick update or interaction. This is a scheduled process in Clarity named 
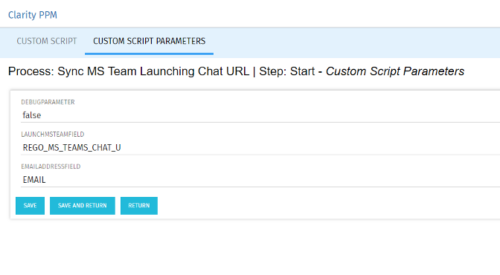
Sync MS Team Launching Chat URL and will be scheduled to run for various frequency. When the process kick in it will be setting the Team link into the custom URL attribute of the Resource, which can be used to Launch Team chat from the tool. Sync Process come with two parameters for the Support team, which they can use as per there environment configurations. These two Gel parameters for quick configuration are:
    •  launchMSTeamField: parameter for the Custom Resource Field to store Launch URL
    •   emailAddressField: parameter for field to pick mail address in SRM_RESOURCES table
  • A presentation slide deck from Rego University 2022.   This document reviews the best practices for project management in Clarity.
    • Typical PM Activities
    • Use Clarity: Get Off of Excel
    • Make Information Easier to Access
    • Make Flags Easy to Identify
    • Simplify & Automate Reporting
    • Open Discussion #3
    • Work with a Regular Cadence
    • Sample Schedule
     
  • This training document is a Rego Consulting Quick Reference Guide to assist with utilization of the Staffing page in Clarity’s Modern User Experience.  This doc references version 16.1 views. Document provides detail on the layout and capabilities of the Staff Grid as well as the Allocations Timeline. Information is provided on columns, widgets and filtering. Instructions are provided on how to save Views. Summary information is provided on the layout of the Allocation Timeline and includes detail on the Investment Timeline and the Resource Histogram. Investment Timeline summary contains information on the Allocations by Investments and the Allocations by Resources tabs. While the Resource Histogram section provides screenshots on Resource Availability and Resources by Role.
  • Course Description:   Struggling to figure out how to best organize your blueprints? This class will walk through best practice blueprint design, including how many to have, how to use channels, using custom subobjects within the blueprint, and swapping blueprints at various project stages to mimic project phases or ideas. We’ll highlight some of the creative ways we’ve seen blueprints used in client implementations.
    • ITFM Introduction
    • PMO & IT Finance Collaboration
    • Where ITFM and PPM Meet
    • Connecting PPM with ITFM
  • The Re-Baseline via Change Request process is a simple method for a member of the project (who has the ability to create change requests) to request a re-baseline of the project without the project manager having to perform it. First, the user must create the change request. The user must then start the process within the change request by using the Processes tab. Once started, the process will route an action item to the Project Manager. If rejected, the process will end and the user must start it again (if needed). If approved, the process will then baseline the project and close out the change request.
  • The Time Tracking Stalker - RM workflow process automatically sends an email to Resource Managers for each one of their resources that have not submitted their timesheet for a prior open time period, thus informing the RM if their resources are submitting their timesheets on time. Project Managers will also benefit since the notifications will help to ensure that time is being posted against their projects in a timely manner, helping to provide them with an accurate view of time expended on the projects.
  • Course description: “Are some of your users leveraging a Smartsheet add-on for project planning, or are you looking for an alternative to OWB and MSP? Learn how this new scheduling tool is making waves and adding value for project managers working within CA PPM.”  Download file is the presentation slidedeck.
  • Allocation Compliance for PM report gives a view of resource Allocation percentage for active resources on the team of an investment for a selected Investment Manager. It allows the PM to see resources on their project over the coming months and whether they are over or under allocated. Allocation Percentage is calculated as (‘Allocated Hours’ / ‘Available Hours’) * 100. User can further narrow their search Month Start Date and Investment Manager. User can use exact dates or relative dates for Month Start Date filter parameter.
  • Projects may need additional tasks from pre-existing templates for ease of use. When adding the tasks to the project, select any part of the template needed for your project. In this Quick Reference Guide, a project has already been created.
  • This Portlet allows users to quickly access Documents they uploaded into Projects via the Classic UI à Collaboration tab or via the New UX Documents module.  Clicking on the File Name downloads the file, clicking on the Options gear allows users to export the list to Excel.
Go to Top