
|
-

-
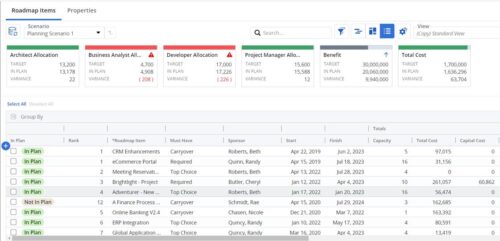 This Roadmap add-on provides configurable Role-based metrics that can be used in the grid view as targets and constraints. Select your valuable roles in the “targets” and once selected, the “sync” button will bring in any current allocations against projects and allow editing any of the total numbers directly in a scenario. This will provide deeper insights into impacts of plans on teams/resources in addition to the out of the box money and time constraints.
 -
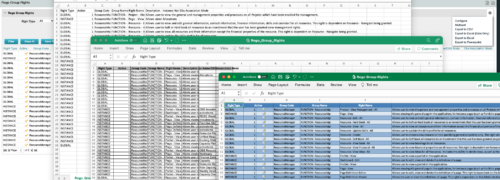
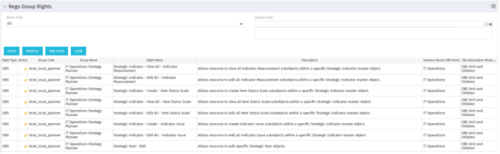 The Rego Group Rights portlet is a useful list view for functional administrators. It provides a flat view of all the Global, OBS and Instance rights that have been granted to all the groups in Clarity. It can be further filtered by just the rights type and/or the security group. It is also possible to export out to file in spreadsheet (csv, xlsx) or PowerPoint formats with OOB Clarity functionality.
 -

Rego’s Clarity Adoption Metrics package consists of two sets of metrics: Project metrics, and Resource metrics. Project metrics measure how effectively project managers are using Clarity to manage their projects. Resource metrics measure how effectively resource managers are using Clarity to manage resources. Metrics are scored on a scale of 0 to 5, with higher scores indicating greater adoption and use. All metrics can be viewed numerically or graphically, and can be broken out by OBS. In addition, metric data can display as a 12-month rolling history to help identify trends. Project metrics can also display by lowest / highest adoption rates for a specific resource metric or all resource metrics. There is a variety of way to view the Adoption Metric data, therefore, Rego has made this simple by creating an Adoption Metrics object that contains multiple tabs. Each tab displays one or more of the Project or Resource Adoption Metrics. Based on the nature of the Metrics some tabs will allow the ability to use a pull down menu to select a specific Adoption Metric. There is also a Metrics trending view that pulls monthly snapshots of the metrics. Project metrics consist of the following: - Project Status Reporting – Measures how well PMs create and publish project status reports.
- Project Risk Adoption – Measures how well Risks are being used and managed.
- Project Issue Adoption – Measures how well Issues are being used and managed.
- Project Schedule – Measures how well PMs create tasks and keep the project schedule current.
- Project Baseline – Measures whether or not baselines exist.
- Project Zero ETC’s – Measures how well the PM assigns resources to tasks with ETCs.
- Project Past ETC’s – Measures how many improperly scheduled tasks the PM has.
- Project Milestone / Key Tasks – Measures how well PMs create and manage Milestones / Key Tasks.
- Project Schedule Variance – Measures how effectively PMs manage their schedules.
- Project Effort Variance – Measures how effectively PMs manage their project efforts.
- Project Budget Variance – Measures how effectively PMs manage budgets or cost plans.
- Project Unfilled Roles – Measures project roles with allocations that are already started or starting within the next 30 days.
- Project Data Quality – Measures how effectively PMs complete the Description, Stage, Progress, Objective, and Sponsor/Business Owner fields.
- Project Commitment – Measures the hard allocations for a project over a two week time frame.
- Resource Clarity Usage – Measures how often users log into Clarity.
- Resource Timesheet – Measures if timesheets post in a timely manner.
- Resource Allocation – Measures how well RMs keep total resource allocations within the expected range for future time periods.
- Resource Actualy Utilization – Measures how well Resource allocations match actuals.
- Resource Allocation Date in the Past – Measures how many resources are open for time entry with dates in the past.
- Resource Data Quality – Measures how well RMs complete the Resource Manager and Primary Role fields and optionally the Skill and Employment Type fields.
- Resource Commitment – Measures how much resource available time is committed to projects.
-
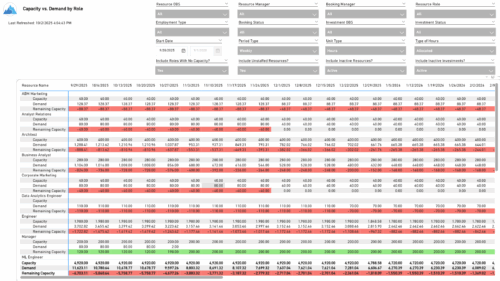
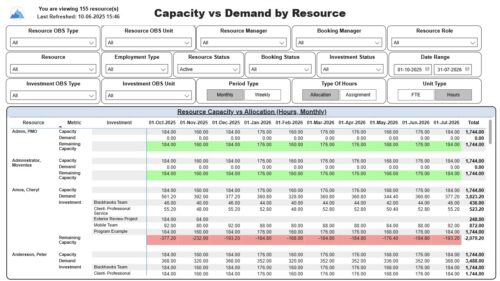 The Capacity vs. Demand by Resource report displays resource capacity and demand at the resource level across investments. The report gives you visibility into the capacity, demand, and remaining capacity by resource. The report displays amounts by week or month, and in total. The amounts might be displayed as hours or FTEs. Report Prerequisites: Verify that you have completed the following prerequisites before you run this report: • The Load Data Warehouse job must be run before you run this report. If the Data Warehouse is not populated, the report will not display any data. Also, most of the report parameters do not display options. • Resource demand allocation amounts display if the resource is allocated to at least one investment and the report display type of hours as allocations. Resource demand assignment amounts display if the resource is assigned to at least one task on the investment and the report displays type of hours as assignments.
 -
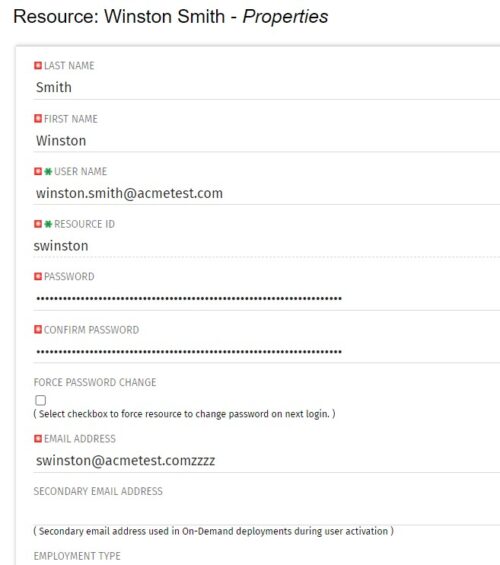 The Update Email Ids workflow sets all users’ email addresses to non-working by appending a “ZZZZ” to the end of the email address. This process is used for when there are refreshes to your Development or Testing environments and do not want emails going to users. When complete, the log will display the total amount of email addresses updated. A second process is included in this workflow that will revert the email addresses to remove the “ZZZZ” added in the first workflow. In some instances, the process may be run in error, or you may want to send emails from a Development or Testing environment; using this second process you will be able to enable all emails again.
 -
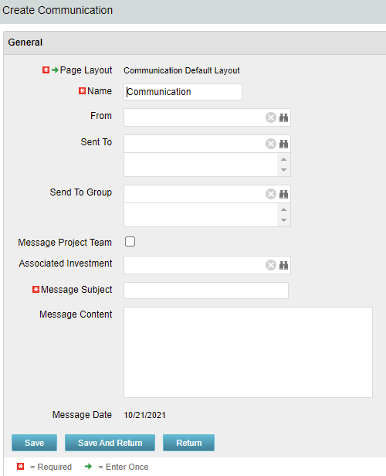 The Communications Object allows a user to send an html-based email to all users on a project, in a security group, or to individual users directly from Clarity. An email can be sent by creating a new entry on the Communication List page, upon saving a new entry the email process with trigger and send the email. Auto Start Solution: An email can be sent by creating a new entry on the Communication List page, upon saving a new entry the email process with trigger. On Demand Solution: All emails could be sent together as a broadcast communication by running the process manually from the Organizer. This process could also be scheduled to run on a specific time using Jobs The table below describes the available columns on the object.
Either of the on-demand process or auto start process should be active at a time. The package provides two Processes: 1. Send Notification (ID:rego_send_notification) This is an auto start process. The notification is sent immediately when a new entry is created on the Communication object. Only one email notification will be sent for one entry. Any updates to the same entry will not trigger any new notifications. 2. Email Communication (ID:rego_email_comm) This is an on-demand process that could be run from the Organizer. This send notification to all the entries on the Communication objects for which a communication was not already sent. This process does not have a Primary object. The processes are designed to work both in Oracle and Postgres environment. If the DB vendor information from Properties.xml is Postgres the SQL query for Postgres will be called. If not, the default SQL is Oracle. Important Note: Either of the processes should be active for an Implementation. If both the processes are active the on-demand process has no effect and will never send any communication. All object entries have a sent flag which will be marked whenever a notification is sent. Both the processes set the same flag on the object instance. Only with admin DB rights this flag could be overwritten. Object Name:Communication Object ID: rego_communication Flag Attribute Name: Sent (Id: rego_sent)Column Label Description From Who the email is coming from Sent To Individual users the message should send to Send to Group Security groups the message should send to (users within the security groups) Message Project Team Should this message be sent to a project team Associated Investment If Message Project Team is checked, which project should the team list be pulled from Message Subject Subject line of the email Message Content Body of the email (html) Message date Internal code used by the query -
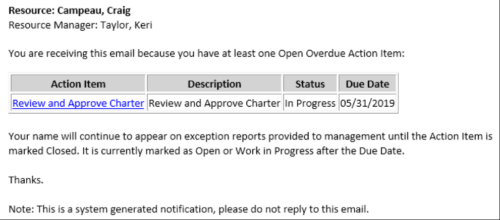 This Process sends an email to every Action Item Assignee where the Due Date/Time has passed and the Status is either Open, or In Progress. Users may want to modify this stalker to include Status = Deferred. In addition, the Resource Manager for the Assignee receives a copy of the email. In order to generate emails, the SMTP gateway must be up and running and Resources must have a valid email address.
 -

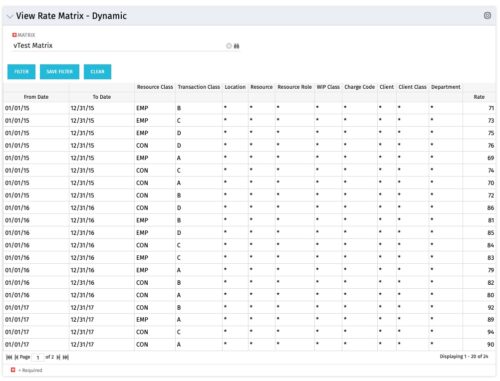 View Rate Matrix is a grid portlet that provides users a single place to view all the rates defined across multiple rate matrix without going to administration tab. Each Matrix may be defined with different columns (ex: Charge Code, Client, Department, Entity, Input type Code etc). This portlet dynamically brings only the columns associated with that rate matrix and provides the detailed information. User can view information related to one matrix at a time.
 -
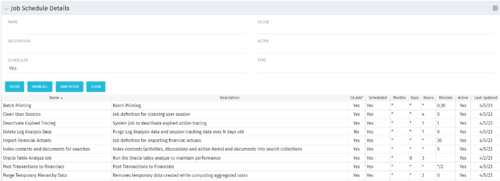 The Job Schedule Details portlet shows al jobs and displays all of the scheduled and non-scheduled information for those jobs – including the months, days, hours, and minutes. It also displays the last time the job was updated and whether or not the job was custom or a CA job. The portlet will help the administrator understand the current job schedule configuration. The table below describes the available columns in the portlet. The first 10 are configured in the default view:
Column Label Description Name Name of the Job Description Description of the Job CA Job? Whether this is CA Job? Yes or No Scheduled Scheduled Status of the Job. Yes or No Months Months the Job is scheduled to run Days Days the Job is scheduled to run Hours Hours the Job is scheduled to run Minutes Minutes the Job is scheduled to run Active Status of Job. Active or Inactive Last Updated Date the Job was Last Updated Code Unique internal Code of the Job Created By Name of Resource who created the Job Date Created Date the Job was created Executable Executable of the Job Job Code Unique Code of the Job Schedule Date Scheduled date of the Job run Type Type Updated By Name of Resource who updated the Job -
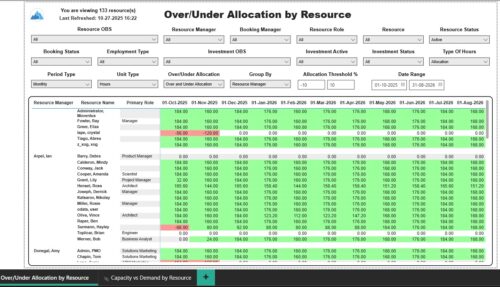 The Over/Under Allocation by Resource report displays resource remaining capacity amounts by resource. The report displays amounts by week or month. The amounts can be displayed as hours or FTEs. This report allows you to drill down to the Capacity vs. Demand by Resource report, by clicking a resource name, to see more information about the resource capacity and demand. Report Prerequisites Verify that you have completed the following prerequisites before you run this report: • The Load Data Warehouse job must be run before you run this report. If the Data Warehouse is not populated, the report will not display any data. Also, most of the report parameters do not display options.
 -
 The Capacity vs. Demand by Role report provides visibility into resource utilization by comparing available capacity to actual demand across investments at the role level. It highlights capacity, demand, and remaining capacity, helping identify potential surpluses or shortfalls. Data can be viewed by week or month and displayed in either hours or full-time equivalents (FTEs) to support detailed workforce planning and analysis.
