-

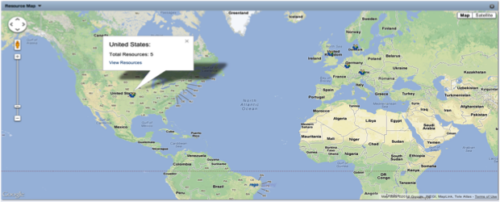 The Resource Map portlet is designed to display resource counts, by country, on a map of the world. Clicking one of the resource markers on the map will display the total resource count for that country. Additionally, a link is provided that connects to a grid portlet which displays all resources that reside in that country. The ability to zoom in and out on areas of the world is available. Due to the requirements outlined in the Special Installation Instructions section, this portlet requires 2-3 Rego Consulting hours to install. Further customization of the data on this map and its associated grid portlet may be requested. Please contact us for more details.
 -
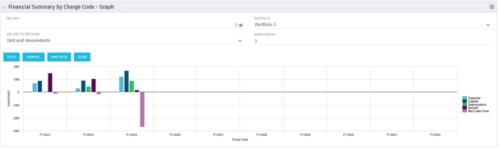 The Financial Summary by Charge Code - Graph portlet displays yearly charge code financial information across all projects in a bar graph. This portlet provides management with a snapshot of all projects’ financial information totaled and sorted by expense, capital, depreciation, benefit, and net cash flow. The depreciation is calculated based on a straight line method. The user may filter on OBS unit and/or portfolio to narrow down the search results.
 -
The Financial Summary by Charge Code - Graph portlet displays yearly charge code financial information across all projects in a bar graph. This portlet provides management with a snapshot of all projects’ financial information totaled and sorted by expense, capital, depreciation, benefit, and net cash flow. The depreciation is calculated based on a straight line method. The user may filter on OBS unit and/or portfolio to narrow down the search results.
-
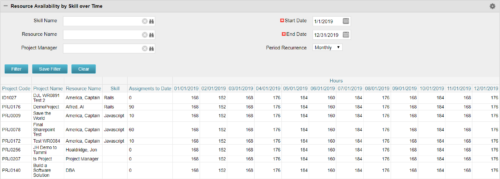 Resource Availability by Skill over Time is a grid portlet that provides Resource Managers a single place to view Resources’ skill sets along with their availability (hrs.) over a period of time. This report also displays the assigned Investments to date and the Actual hours to date for the Resource on those respective Investments. Users can further narrow their search by Skill Name, Resource Name, Project Manager, Start Date, End Date and Period Recurrence.
 -
Resource Availability by Skill over Time is a grid portlet that provides Resource Managers a single place to view Resources’ skill sets along with their availability (hrs.) over a period of time. This report also displays the assigned Investments to date and the Actual hours to date for the Resource on those respective Investments. Users can further narrow their search by Skill Name, Resource Name, Project Manager, Start Date, End Date and Period Recurrence.
-
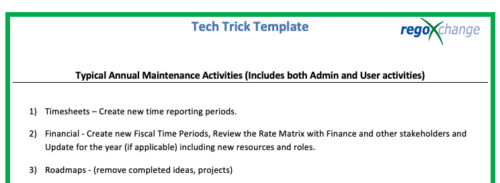 This is a list of 12 typical maintenance items that should be completed for Clarity on an annual basis. There is also a short list of items that should be completed periodically depending on client policies.
 -
 This training document is a Rego Consulting Quick Reference Guide to assist with Time Entry Administration Settings for Timesheets. This doc references version 16.0.3 views. Document provides detail on Timesheet Options for the Modern UX and how to enable end user column configuration. Detail is also provided on how end users may configure their timesheet view.
 -
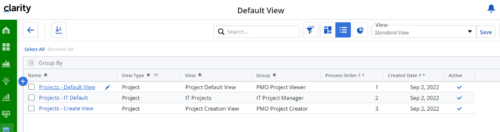
Manage default views for new users based on security groups or publish a view to all users in a specified security group. For more details, please refer to the detailed documentation.
-
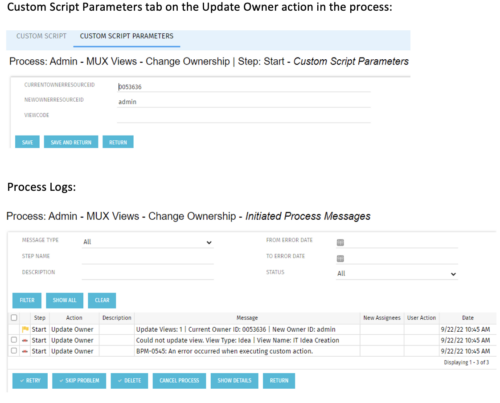 This is a standalone process that can be run by an admin to change the ownership of MUX views from a specified user to another specified user. The process contains a single custom script, which has the following parameters that must be updated prior to running the process:
- currentOwnerId (required): Resource ID for the current Owner (unique_name from srm_resources table)
- newOwnerId (required): Resource ID for the new Owner (unique_name from srm_resources table)
- viewCode (optional): Code for the specific view to update - leave blank if you want to transfer ownership for all views (odf_ui_views.code)
- Navigate to the process called Admin - MUX Views - Change Ownership.
- Navigate to the Start Step tab, Click on the Update Owner action, and click the Custom Script Parameters tab.
- Enter the Resource ID for the current view owner into the currentOwnerId parameter.
- Enter the Resource ID for the new owner into the newOwnerId parameter.
- If you want to update a specific view only, enter that in the viewCode parameter.
- Run the process via Organizer in Classic.


Copyright 2023 • Rego Consulting Corporation • Privacy Policy