-
 Course Description: Are you using an older version of Clarity PPM? Do you want to understand the value of new features and functions in recent versions? This class is a demonstration of the new features and the value of these features for customers.
 -
 Do you want to understand the value of the new functionality in Clarity's most recent rollout? This class is for you! Attend an interactive demonstration and put these capabilities in action today.
 -
 Are you on an older version of Clarity? Do you want to understand the value of the new features and functions in recent versions? This class is a demonstration of the new features and the value of these features for customers.
 -
 A presentation slide deck from Rego University 2022. This document reviews the changes to Clarity with the release of version 16.0.3.
- Roadmap Enhancements
- Checklists and To-Dos
- Project and CIT List Enhancements
- Sub-Object Enhancements
- Customer Requests
-
 Are you on an older version of Clarity? Do you want to understand the value of the new features and functions in recent versions? This class is a demonstration of the new features and the value of these features for customers.
 -
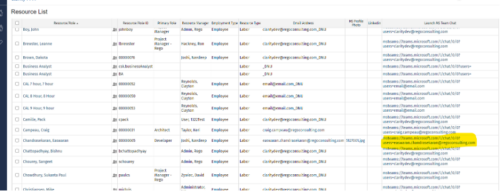
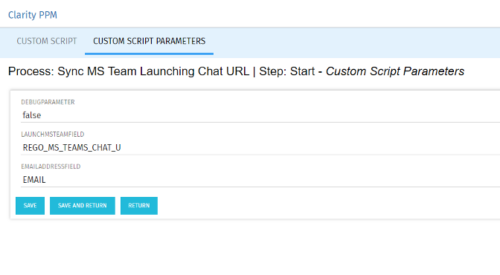 Launch a Team chat with your users directly from the Clarity PPM tool. This is a good way to collaborate with the team and users for any quick update or interaction. This is a scheduled process in Clarity named Sync MS Team Launching Chat URL and will be scheduled to run for various frequency. When the process kick in it will be setting the Team link into the custom URL attribute of the Resource, which can be used to Launch Team chat from the tool. Sync Process come with two parameters for the Support team, which they can use as per there environment configurations. These two Gel parameters for quick configuration are:
- launchMSTeamField: parameter for the Custom Resource Field to store Launch URL
- emailAddressField: parameter for field to pick mail address in SRM_RESOURCES table
-
 With every new PPM process, the organization must adopt change. Change is constant in an organization. This session will talk about keys to successfully leading change vs. just implementing change in your organization.
 -
 A presentation slide deck from Rego University 2022. This document reviews the importance and principles of Organizational Change Management.
- Why is Organizational Change Management Important?
- Impacts of not recognizing the need for an Organization Readiness (OR) Plan
- What are the components of Organizational Change Management?
- Considerations and activities for building a good OR Plan
- How to execute Organizational Change Management
- Framework – Proven Methodologies and Tools
- Q&A
-
 Lean Portfolio Management (LPM) is one of the most researched and in demand topics for modern enterprises. Come learn what LPM is, key LPM practices and roles needed for success, and how Clarity and Rally provide end to end visibility from strategy to execution.
 -
 Lean Portfolio Management (LPM) is one of the most researched and in demand topics for modern enterprises. Come learn what LPM is, key LPM practices and roles needed for success, and how Clarity and Rally provide end to end visibility from strategy to execution.
 -
 Lean Portfolio Management (LPM) is one of the seven SAFe components of the Lean Enterprise. LPM helps organizations solve numerous challenges by decreasing the delivery of time to value, enabling the organization to pivot quickly in ever-shifting markets, and more.
 -
 Have you ever thought about tracking customer feedback as part of your project closure? This class will show how lessons learned can be entered and tracked within CA PPM.
 -
 Course description: “It’s easy to focus on the “cool” new features of the latest release and overlook the impact on specific End Users, and how they actually use new features and modules. Focusing on what Users need and want may not be easy, but it will lead to greater engagement, strong adoption and increase value of CA PPM. Join Empowered Networks for this session to discuss how to leverage User Personas in configuring CA PPM.”
 -
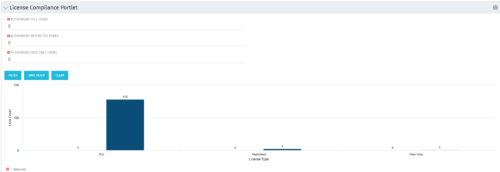 Portlet to quickly show License Compliance for all license types. Simply Enter your License Limits in the filter – The portlet will display the three license types in a grid format with compliance chart and RYG Icons.
 -
Portlet to quickly show License Compliance for all license types. Simply Enter your License Limits in the filter – The portlet will display the three license types in a grid format with compliance chart and RYG Icons.
-
Portlet to quickly show License Compliance for all license types. Simply Enter your License Limits in the filter – The portlet will display the three license types in a grid format with compliance chart and RYG Icons.
-
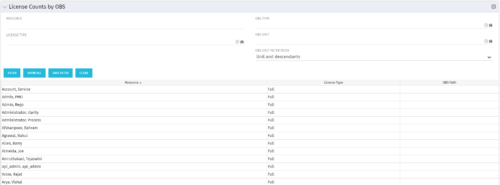 The License Count by OBS portlet displays license type information by a selected OBS for active users. The portlet is used to determine what kind of license a specific user has and the OBS in which he or she resides. It can be helpful for determining specific amount of licenses used by different departments within the organization.
 -
The License Count by OBS portlet displays license type information by a selected OBS for active users. The portlet is used to determine what kind of license a specific user has and the OBS in which he or she resides. It can be helpful for determining specific amount of licenses used by different departments within the organization.
-
 The primary purpose of roles is to determine the amount of resource requests based on unapproved (uncommitted) and approved (committed) projects. Roles are non-named resources which are later allocated to named resources within CA PPM. Using roles is the best way to do "What If" scenario planning and determine needed capacity. This document assists in making Best Practice decisions around setting up roles in Clarity.
 -
 This training document is a Rego Consulting Quick Reference Guide to assist with the adding of URL links and use of the conversation functionality in Clarity’s Modern User Experience.
 -
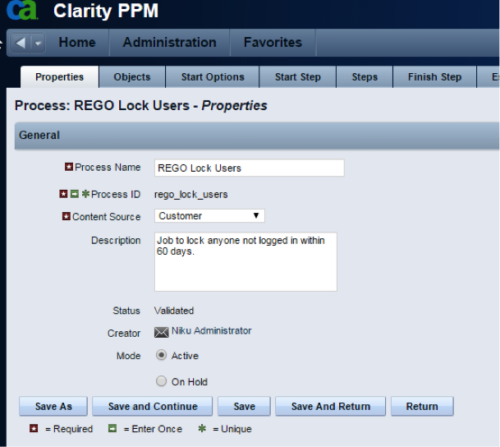 The Lock Inactive Users workflow process will automatically lock all user accounts when their last login date was more than 60 days ago. The process can be scheduled to run daily or can be run on demand when resource account cleanup is needed.
 -
The Lock Inactive Users workflow process will automatically lock all user accounts when their last login date was more than 60 days ago. The process can be scheduled to run daily or can be run on demand when resource account cleanup is needed.
-
The Lock Inactive Users workflow process will automatically lock all user accounts when their last login date was more than 60 days ago. The process can be scheduled to run daily or can be run on demand when resource account cleanup is needed.
-
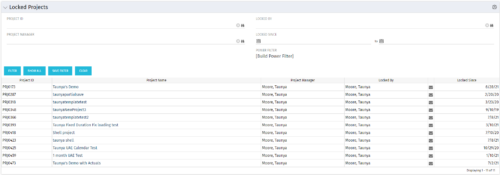 The Locked Projects portlet displays all of the projects in the system that are currently in a ‘locked’ state. The user may view the project ID, Project Name, Project Manager, the user who locked the project, the user's email address, and the date the project was locked. Administrators may utilize the data in this portlet in order to determine if a manual unlock should be executed on a project that has been locked for an extended period of time. Extended locks may indicate the individual has forgotten that he or she had obtained the lock. The portlet includes a hyperlink on the Project Name field, which will allow the administrator to more easily access and unlock the project as well as an email link to mail the user who locked the project.
 -
The Locked Projects portlet displays all of the projects in the system that are currently in a ‘locked’ state. The user may view the project ID, Project Name, Project Manager, the user who locked the project, the user's email address, and the date the project was locked. Administrators may utilize the data in this portlet in order to determine if a manual unlock should be executed on a project that has been locked for an extended period of time. Extended locks may indicate the individual has forgotten that he or she had obtained the lock. The portlet includes a hyperlink on the Project Name field, which will allow the administrator to more easily access and unlock the project as well as an email link to mail the user who locked the project.
-
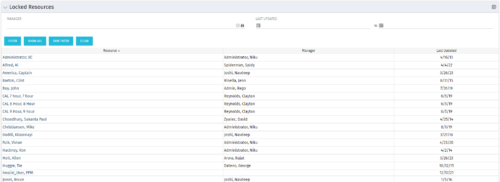 The Locked Resources portlet displays all resources that are locked within Clarity. It also displays the resource manager and last updated date for the user. The portlet can be filtered on resource manager and last updated date range. This portlet can be used by an administrator to determine which resources are locked by the system.
 -
The Locked Resources portlet displays all resources that are locked within Clarity. It also displays the resource manager and last updated date for the user. The portlet can be filtered on resource manager and last updated date range. This portlet can be used by an administrator to determine which resources are locked by the system.
-
 London Stock Exchange shares their Clarity journey (since 2008) and where they want to take the tool next. Current goals are: • Moving toward standardized ways of working. Focused on connecting our ecosystem of tools with Clarity as a focal point for Portfolio Management and SPM. • With an end goal of Faster Time to Market, on a journey to be a Customer Lead organization.
 -
 The Manage Risk Categories document provides the steps needed to modify the current system-defined list of values for the Risk categories
 -
 A presentation slide deck from Rego University 2022. This course taught an Agile approach to managing finances.
- IT Planning Essentials
- Common Practices & Challenges
- Leading IT Planning Approaches
- Continuous Planning vs Annual Planning
-
 Course Description: Does your IT organization struggle with IT budgeting and annual planning? Does your annual budget and planning process take months? This session explores leading approaches and purpose-built tools to shorten your budget cycle, align resources to business needs, and plan resources into future years while reducing errors and manual effort.
 -
 A Quick Reference Guide to assist in managing a Custom Investment in Clarity’s Modern UX. Reviews accessing the Custom Investment Link and navigating the tabs.
 -
 This training document is a Rego Consulting Quick Reference Guide to assist with management of Custom Investments in Clarity’s Modern User Experience. The document reviews navigation to a custom investment and then the various tabs related to the management of the investment.


Copyright 2023 • Rego Consulting Corporation • Privacy Policy