-
 Are you struggling with implementing Agile tools in your organization in addition to Clarity? This class will review best practices for implementing agile tools in conjunction with Clarity - living in a Bi-Modal world. We will discuss how Clarity can be used to govern both types of work and teams and how Agile tools should interface into Clarity.
 -
 Agile is here to stay, but waterfall may be as well. Companies around the world struggle with living in a bimodal development world, while trying to go through an agile transformation. This session will discuss best practices and lessons learned within companies that have gone through agile transformations. We will also review SAFe as a potential approach.
 -
 Struggling to use an external scheduler like MS Project or Smartsheet with Clarity or investigating its potential? Learn how to effectively use these tools with Clarity in this training, which includes best practices and lessons learned. We will show both OOTB and Rego build connectors that will make the bidirectional connections seamless.
 -
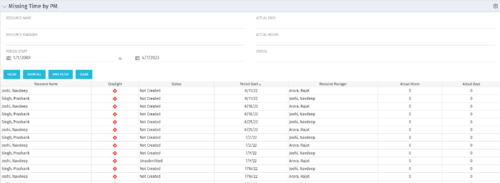
 The Missing Time by PM portlet displays all missing or late timesheets for resources staffed on a project where the logged in user is the project manager. Resources will be listed if they are open for time entry, have a track mode of Clarity, and have timesheet that is not posted (accommodates for hire and termination dates). Project managers may use this portlet to determine the timesheet status of resources staffed on their projects. You may narrow the results by filtering by resource manager, period start, resource name, or status. The portlet will display an indicator based on timesheet status, the status, period start, resource name, and actual hours for the timesheet.
 -
 The Missing Time by PM portlet displays all missing or late timesheets for resources staffed on a project where the logged in user is the project manager. Resources will be listed if they are open for time entry, have a track mode of Clarity, and have timesheet that is not posted (accommodates for hire and termination dates). Project managers may use this portlet to determine the timesheet status of resources staffed on their projects. You may narrow the results by filtering by resource manager, period start, resource name, or status. The portlet will display an indicator based on timesheet status, the status, period start, resource name, and actual hours for the timesheet.
 -
 The Missing Time by PM portlet displays all missing or late timesheets for resources staffed on a project where the logged in user is the project manager. Resources will be listed if they are open for time entry, have a track mode of Clarity, and have timesheet that is not posted (accommodates for hire and termination dates). Project managers may use this portlet to determine the timesheet status of resources staffed on their projects. You may narrow the results by filtering by resource manager, period start, resource name, or status. The portlet will display an indicator based on timesheet status, the status, period start, resource name, and actual hours for the timesheet.
 -
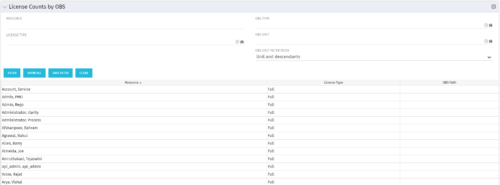
 The License Count by OBS portlet displays license type information by a selected OBS for active users. The portlet is used to determine what kind of license a specific user has and the OBS in which he or she resides. It can be helpful for determining specific amount of licenses used by different departments within the organization.


