-
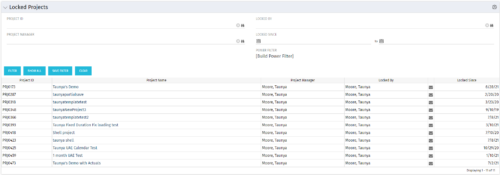 The Locked Projects portlet displays all of the projects in the system that are currently in a ‘locked’ state. The user may view the project ID, Project Name, Project Manager, the user who locked the project, the user's email address, and the date the project was locked. Administrators may utilize the data in this portlet in order to determine if a manual unlock should be executed on a project that has been locked for an extended period of time. Extended locks may indicate the individual has forgotten that he or she had obtained the lock. The portlet includes a hyperlink on the Project Name field, which will allow the administrator to more easily access and unlock the project as well as an email link to mail the user who locked the project.
 -
The Locked Projects portlet displays all of the projects in the system that are currently in a ‘locked’ state. The user may view the project ID, Project Name, Project Manager, the user who locked the project, the user's email address, and the date the project was locked. Administrators may utilize the data in this portlet in order to determine if a manual unlock should be executed on a project that has been locked for an extended period of time. Extended locks may indicate the individual has forgotten that he or she had obtained the lock. The portlet includes a hyperlink on the Project Name field, which will allow the administrator to more easily access and unlock the project as well as an email link to mail the user who locked the project.
-
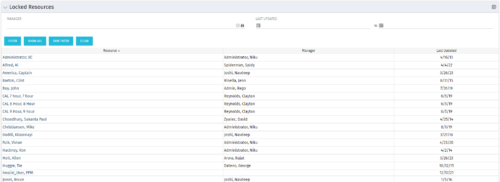 The Locked Resources portlet displays all resources that are locked within Clarity. It also displays the resource manager and last updated date for the user. The portlet can be filtered on resource manager and last updated date range. This portlet can be used by an administrator to determine which resources are locked by the system.
 -
The Locked Resources portlet displays all resources that are locked within Clarity. It also displays the resource manager and last updated date for the user. The portlet can be filtered on resource manager and last updated date range. This portlet can be used by an administrator to determine which resources are locked by the system.
-
 London Stock Exchange shares their Clarity journey (since 2008) and where they want to take the tool next. Current goals are: • Moving toward standardized ways of working. Focused on connecting our ecosystem of tools with Clarity as a focal point for Portfolio Management and SPM. • With an end goal of Faster Time to Market, on a journey to be a Customer Lead organization.
 -
 The Manage Risk Categories document provides the steps needed to modify the current system-defined list of values for the Risk categories
 -
 In Jaspersoft Studio, Static Text and Text Fields can display text with markup instead of plain text. This allows a wide variety of customization to how the text is displayed. This Tech Trick provides Instructions on how to use this feature of Jaspersoft Studio.
 -
 Have you ever experienced the downside of metrics? This class is a working session that review different types of metrics and the problems they uncover as well as the problems they can cause. Learn how to balance your positive and negative metric impacts.
 -
 Looking for metrics that you can implement immediately in CA PPM? This class will be a working session to review all of the content available out of the box and within the CA and Rego content packs. This will provide you the options for metrics the represent industry best practice without the costs to develop them.
 -
 See how multiple Rego innovations can save time, reduce effort, and increase adoption across your organization. Leverage Power Automate to connect Clarity with SharePoint, Teams, and Outlook—automating tasks like creating Teams for projects, managing permissions, and sharing reports with non-Clarity users. Discover how the RegoLink PowerPoint add-in keeps decks up to date with templates and live Clarity data, and how the Excel Data Manager (EDM) simplifies bulk updates by letting you edit and validate data in Excel before syncing back.
 -
 A presentation slide deck from Rego University 2022. This document reviews the reasons for and the steps to migrate to Clarity’s Modern User Experience.
- Introduction
- Why?
- Migration Strategies
- Planning the Pilot
- Tactical Checklist
-
 Are you still using Clarity's classic User Experience? Are you getting behind on leveraging Modern UX capabilities? This class will be a practical guide on how to move your users to the Modern UX. We will discuss real use cases and help provide guidance on this strategic decision. We also plan to have a portion of the class dedicated to Q&A with customers that have already migrated.
 -
 Are you still using all classic UX? Are you wondering how and when you should transition to the new UX? This class will be a practical guide on how to know what to move and when to move. We will discuss real use cases and help provide guidance on this strategic decision.
 -
 Are you still using the classic User Experience? Are you wondering how and when you should transition to the ModernUX? This class will be a practical guide on how to move your users to the ModernUX. We will discuss real use cases and help provide guidance on this strategic decision. We also plan to have a portion of the class that is Q&A from customers that have moved.
 -
 Are you still using all classicUX? Are you wondering how and when you should transition to the newUX? This class will be a practical guide on how to move your users to the newUX. We will discuss real use cases and help provide guidance on this strategic decision.
 -
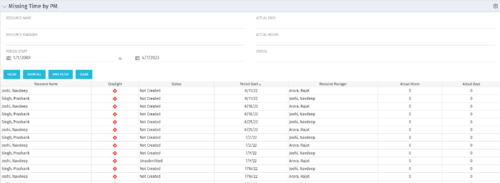 The Missing Time by PM portlet displays all missing or late timesheets for resources staffed on a project where the logged in user is the project manager. Resources will be listed if they are open for time entry, have a track mode of Clarity, and have timesheet that is not posted (accommodates for hire and termination dates). Project managers may use this portlet to determine the timesheet status of resources staffed on their projects. You may narrow the results by filtering by resource manager, period start, resource name, or status. The portlet will display an indicator based on timesheet status, the status, period start, resource name, and actual hours for the timesheet.
 -
The Missing Time by PM portlet displays all missing or late timesheets for resources staffed on a project where the logged in user is the project manager. Resources will be listed if they are open for time entry, have a track mode of Clarity, and have timesheet that is not posted (accommodates for hire and termination dates). Project managers may use this portlet to determine the timesheet status of resources staffed on their projects. You may narrow the results by filtering by resource manager, period start, resource name, or status. The portlet will display an indicator based on timesheet status, the status, period start, resource name, and actual hours for the timesheet.
-
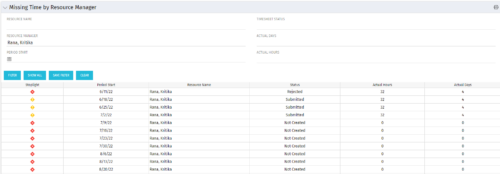 The Missing Time by RM portlet displays all missing or late timesheets for resources for which the logged in user has resources (logged in user is the RM). Resources will be listed if they are open for time entry, have a track mode of Clarity, and have timesheet that is not posted (accommodates for hire and termination dates). Resource managers may use this portlet to determine the timesheet status of all resources in open time periods. The portlet will display an indicator based on timesheet status, the status, period start, resource name, and actual hours for the timesheet.
 -
The Missing Time by RM portlet displays all missing or late timesheets for resources for which the logged in user has resources (logged in user is the RM). Resources will be listed if they are open for time entry, have a track mode of Clarity, and have timesheet that is not posted (accommodates for hire and termination dates). Resource managers may use this portlet to determine the timesheet status of all resources in open time periods. The portlet will display an indicator based on timesheet status, the status, period start, resource name, and actual hours for the timesheet.
-
 MITRE will discuss the recent revival of Clarity enabled by an upgrade and elimination of on-premise, non-compliant customizations and their success story. The project leader will address the steps to execute this transformation and the approach taken towards organizational change management.
 -
 MITRE will discuss the recent revival of Clarity enabled by an upgrade and elimination of on-premise non-compliant customizations and their success story. The project leader will address the steps to execute this transformation and the approach taken towards organizational change management.
 -
 A presentation slide deck from Rego University 2022. This document is course material for an Advanced Admin class for Clarity’s Modern UX. Focus on this class was on Blueprints.
- A presentation slide deck from Rego University 2022. This document is course material for an Advanced Admin class for Clarity’s Modern UX. Focus on this class was on Blueprints.
- Pages
- Modules - Channels
- Rules
- Fields Level Security
- Actions
- A presentation slide deck from Rego University 2022. This document is course material for an Advanced Admin class for Clarity’s Modern UX. Focus on this class was on Blueprints.
-
 A presentation slide deck from Rego University 2022. This document is an outline of the basic administration of Clarity’s Modern User Experience.
- Introduction
- First time setup
- Activating Modern UX and Timesheets
- Creating a Link to the Modern UX in the Classic Home Menu
- Navigation and modules
- Blueprints
-
 Transitioning to the modern UX or implementing Clarity for the first time? Learn how to configure Modern UX: - First time setup - navigation and modules - Blueprints (basic) - Personalize the UI/Announcements
 -
 This course will take a deep dive into Modern UX administration. We'll cover the advanced MUX Administration settings, managing system wide views before deep diving into advanced blueprints topics such as visuals, modules, rules, and actions.
 -
 This beginner-friendly course will cover basic administration within Modern UX. You'll learn about enabling MUX, establishing your System Settings, and Blueprints basics.
 -
 Clarity's Modern Experience has been a game changer for end-users, but did you know there are some fantastic capabilities for admins? Come to this session to learn about how to set up the modern experience, the module capabilities, blueprints, fields/attributes, and how to personalize your experience.
 -
 This Tech Trick covers instructions for modifying the default colors of a Chart in Jaspersoft Studio Reports using a dynamic expression. It includes step-by-step instructions for an example bar chart color change.
 -
 Do you have teams or groups that have a need for simple collaborative work management but are not using Clarity. And are those tools falling short when it comes to important issues such as visibility and governance. In this session you'll learn about Moventus a new add-on collaborative work management solution that can be embedded into Clarity.
 -

 The Multi-Value Filter in Query-Based technical trick document provides an overview of how to create a multi-value lookup in a portlet filter, where the field is a parameter within the query. If the query imbeds the parameter normally, the portlet will only be able to have a single selection of that parameter. This technical solution will enable you to make these parameters multi-selects.
 -

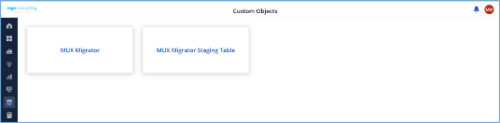
*Note: MUX Migrator v2.0 will only work on Clarity versions 16.1.0 and higher. The Migration Tool for Modern UX Components provides the ability to migrate Blueprints, Views, and Field Level Security between environments. Previously, the promotion of these components needed to be done manually. This functionality, to be utilized by an administrator, is available under the Custom Objects Area of Clarity. Source to Target Approach The user would first create an ‘MUX Migrator’ instance and populate the associated details. Once ready, they will use the “Populate Stage Content” action which will run a workflow in the background to populate a Staging Table with Source Environments content. (Blueprints, Views, and Field Level Security)Installation files are not provided with the download. While the MUX Migration Tool is free, it does require some time by Rego Technical Staff to install. Approximately 4 hours is required. If you are current Rego Customer, this time can be applied against a current project if you choose, or against an Ad Hoc SOW/PO you have in place with us. Please reach out to your friendly Rego Account Director to arrange to have the tool installed. Installation files are not provided with this download. They will be installed by our staff. If you are currently not a Rego client, we invite you to reach out to us at info@regoconsulting.com and we can arrange to set up an Ad Hoc bucket of hours for this install and any future work we can do for you. After a successful populate, they would navigate to the “MUX Configuration” module where they can decide on what content they want to migrate between environments. They can select one to many components they wish to migrate. Once the “MUX Configuration” sub-object is populated, the user can navigate back to the “Properties” module. Once a password is populated, the user can use the Actions drop-down to run the “Migrate Content to Environment” workflow. This will run a process that will migrate the content from the source environment to the target environment. JSON Approach The user would first create an ‘MUX Migrator’ instance and populate the associated details. They would navigate to the “MUX Configuration” module where they can decide on what content they want to migrate between environments. They can select one to many components they wish to migrate. Once the “MUX Configuration” sub-object is populated, the user can navigate back to the “Properties” module. The user can use the Actions drop-down to run the “Export JSON” workflow. This will run a process that will generate a .txt file located in the “JSON File” attribute. That file can be downloaded from the Source Environment. The user can then login to the Target Environment. The user would first create an ‘MUX Migrator’ instance and populate the associated details. Once the ‘MUX Migrator’ instance is created, they can upload the JSON File that was downloaded from the Source Environment. The user can use the Actions drop-down to run the “Import JSON” workflow. This will run a process that will generate read the file located in the “JSON File” attribute and load the configuration into the Target Environment. View Administration The user would first create an ‘MUX Migrator’ instance and populate the associated details. They would navigate to the “MUX View Administration” module where they can decide on what views they would like to update the creator of. They can also reset the “default” view displayed when logged in for a resource(s), Security Group(s), or Resource OBS Node(s). Prerequisites - The user will create the migrator instances/run the processes in the Target Environment they wish to migrate content to (E.g., Run this in PROD to migrate the content from a lower environment to PROD)
- Any attributes that are part of the Blueprints, Views, or Field Level Security must exist in the target environment.
- The user that is utilizing the content must have the following security rights associated to their account.
- XOG rights to all the associated objects
- View/edit security rights to the MUX Migrator Object and MUX Migrator Content Object
- oView rights to the MUX Migrator Staging Table Object
- API-Access
- Process Start or Process AutoStart – All
-
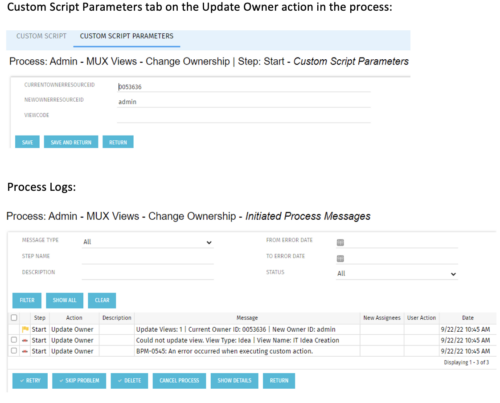 This is a standalone process that can be run by an admin to change the ownership of MUX views from a specified user to another specified user. The process contains a single custom script, which has the following parameters that must be updated prior to running the process:
- currentOwnerId (required): Resource ID for the current Owner (unique_name from srm_resources table)
- newOwnerId (required): Resource ID for the new Owner (unique_name from srm_resources table)
- viewCode (optional): Code for the specific view to update - leave blank if you want to transfer ownership for all views (odf_ui_views.code)
- Navigate to the process called Admin - MUX Views - Change Ownership.
- Navigate to the Start Step tab, Click on the Update Owner action, and click the Custom Script Parameters tab.
- Enter the Resource ID for the current view owner into the currentOwnerId parameter.
- Enter the Resource ID for the new owner into the newOwnerId parameter.
- If you want to update a specific view only, enter that in the viewCode parameter.
- Run the process via Organizer in Classic.


Copyright 2023 • Rego Consulting Corporation • Privacy Policy